Resource requests help project managers request the right people, skills, and allocation changes for their projects. They also give resource managers and approvers a centralized way to review staffing needs, assign resources, block requests, or approve allocation changes.
This article explains the types of resource requests supported in Rocketlane, how to raise and manage requests, and how approvers can review, approve, block, and assign approvers to requests.
In this article
Who can use resource requests
Resource requests help teams manage project staffing through a clear request and approval process.
- Who can raise a request: Users with Admin or Super User permissions can raise resource requests.
- Who can approve requests: Users with Admin or Super User permissions can approve resource requests.
Types of resource requests
When managing a project, you may need to request new resources, modify existing allocations, or replace resources based on project needs. Resource requests help project managers communicate these staffing requirements to the resource management team.
You can raise requests for:
- Adding a new team member
- Adding additional hours
- Assigning a placeholder
- Replacing a resource
- Shifting allocations
- Deleting allocations

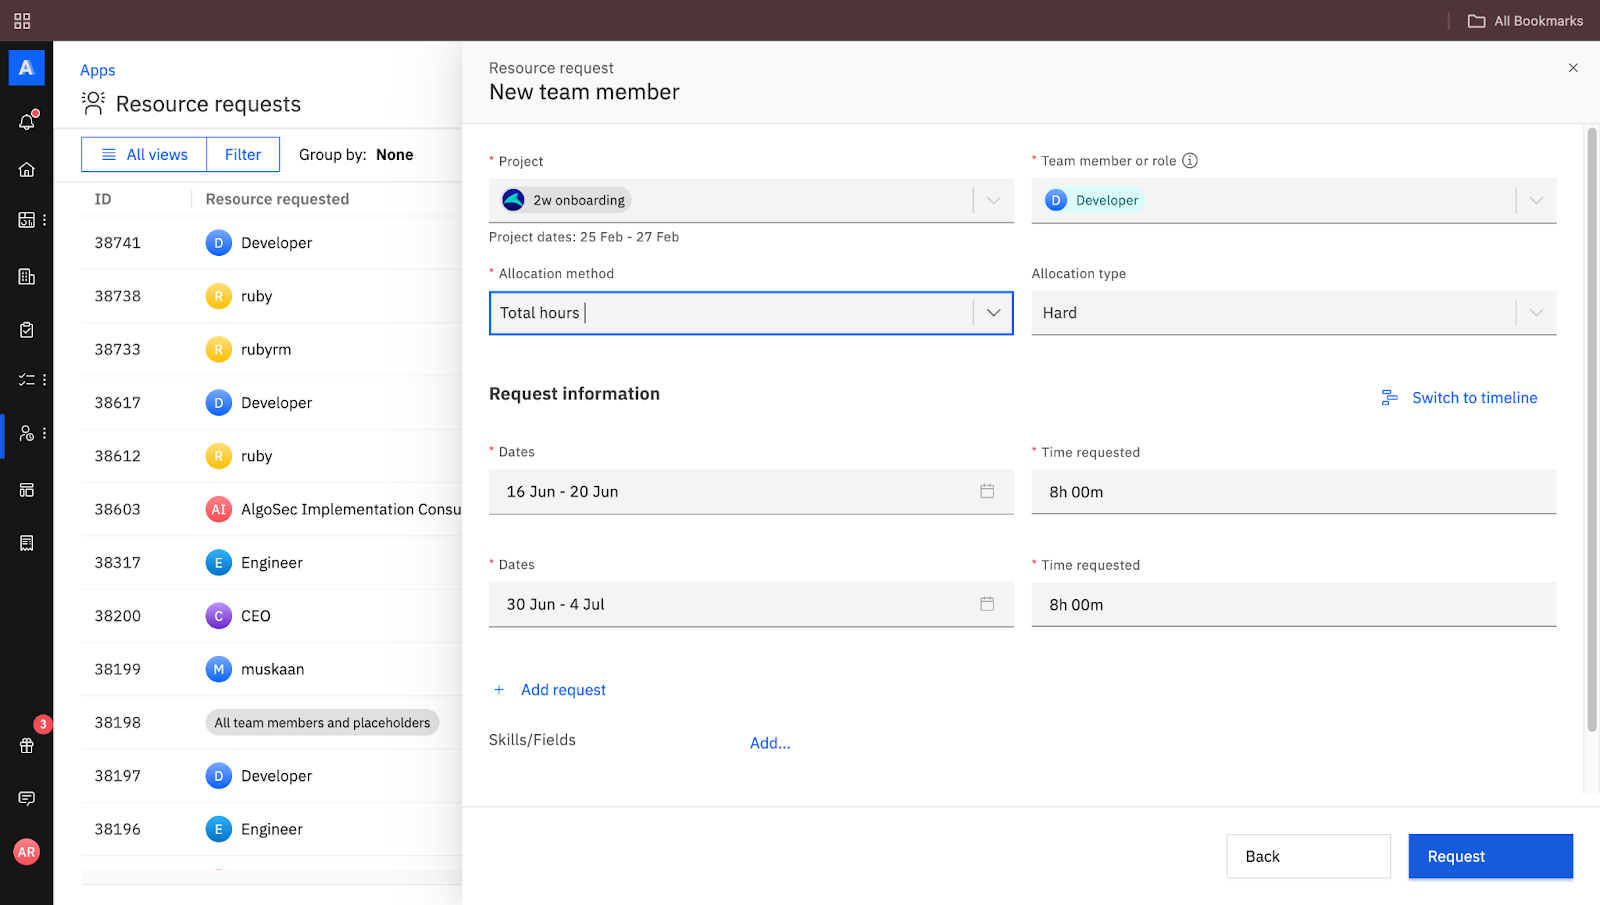
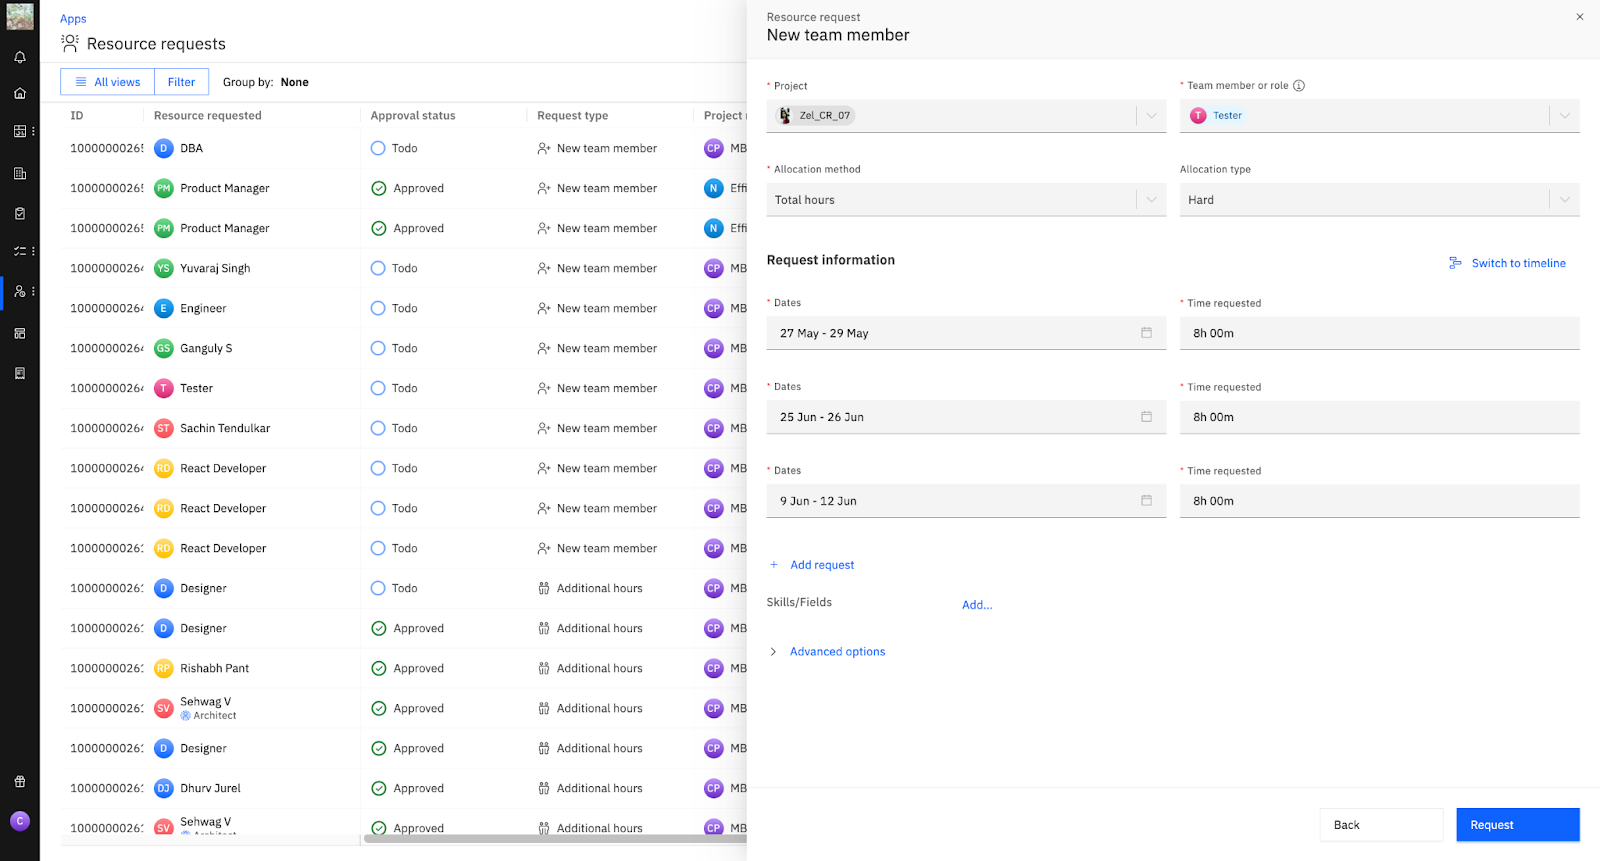
Add new team member
Use this request when you need a new team member for a project. This can happen at any stage of the project, such as planning, proposed, pipeline, or active delivery.
When raising the request, you can provide details such as the required region and skill set. Based on this information, Rocketlane suggests suitable team members for allocation.
Add additional hours
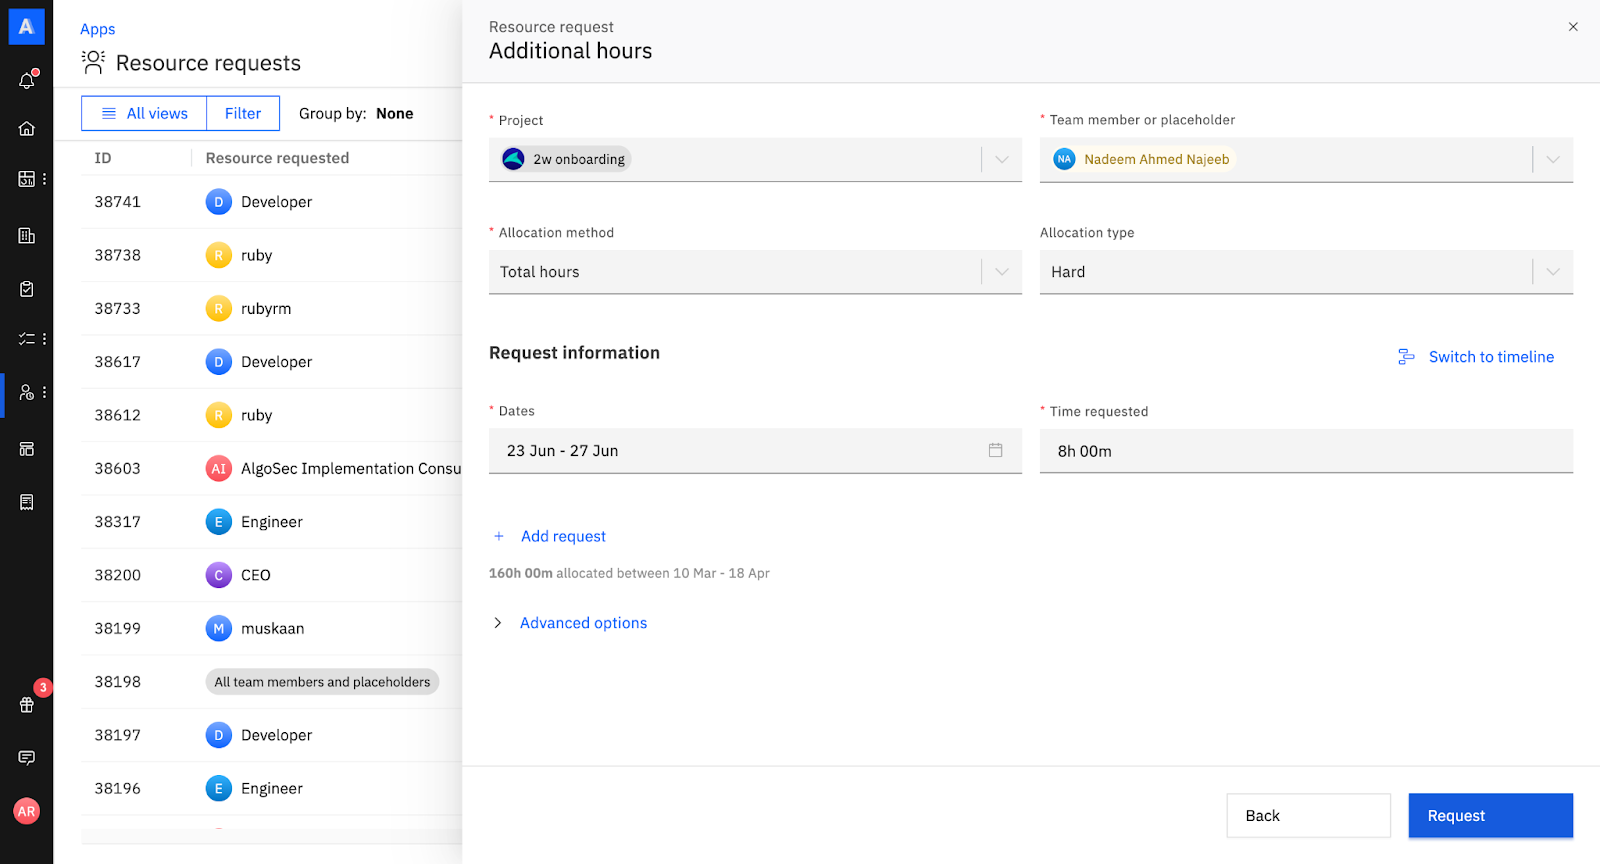
Use this request when a project needs more time from a specific team member or role. This is useful when the project scope changes, client needs increase, or a role needs to contribute more hours than originally planned.
Rocketlane also shows whether the user you are requesting additional hours for is already over-allocated.
Assign a placeholder
Projects created from templates may include tasks assigned to placeholders or tasks that remain unassigned because a matching team member was not available earlier.
Use this request to ask the resource management team to find and assign the right team member to resolve the placeholder in the project.
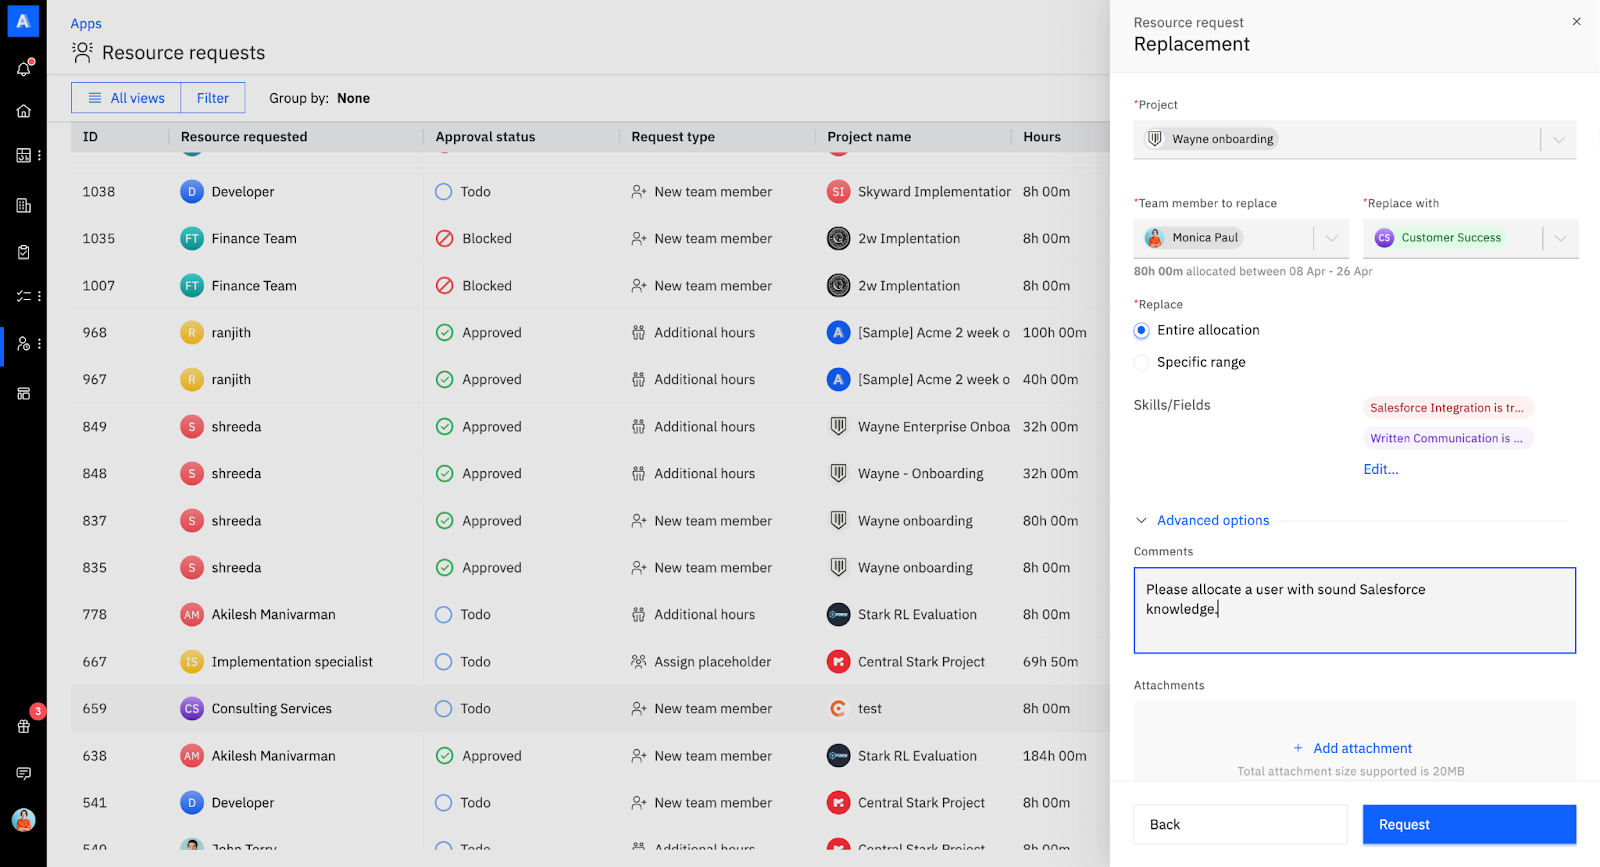
Replacement request
Use this request to replace a team member in a project. The replacement can be a placeholder or another team member, either for the full allocation period or for a specific time range.
If you select a role as the replacement, you can specify the required skills to help the approver find the right match.
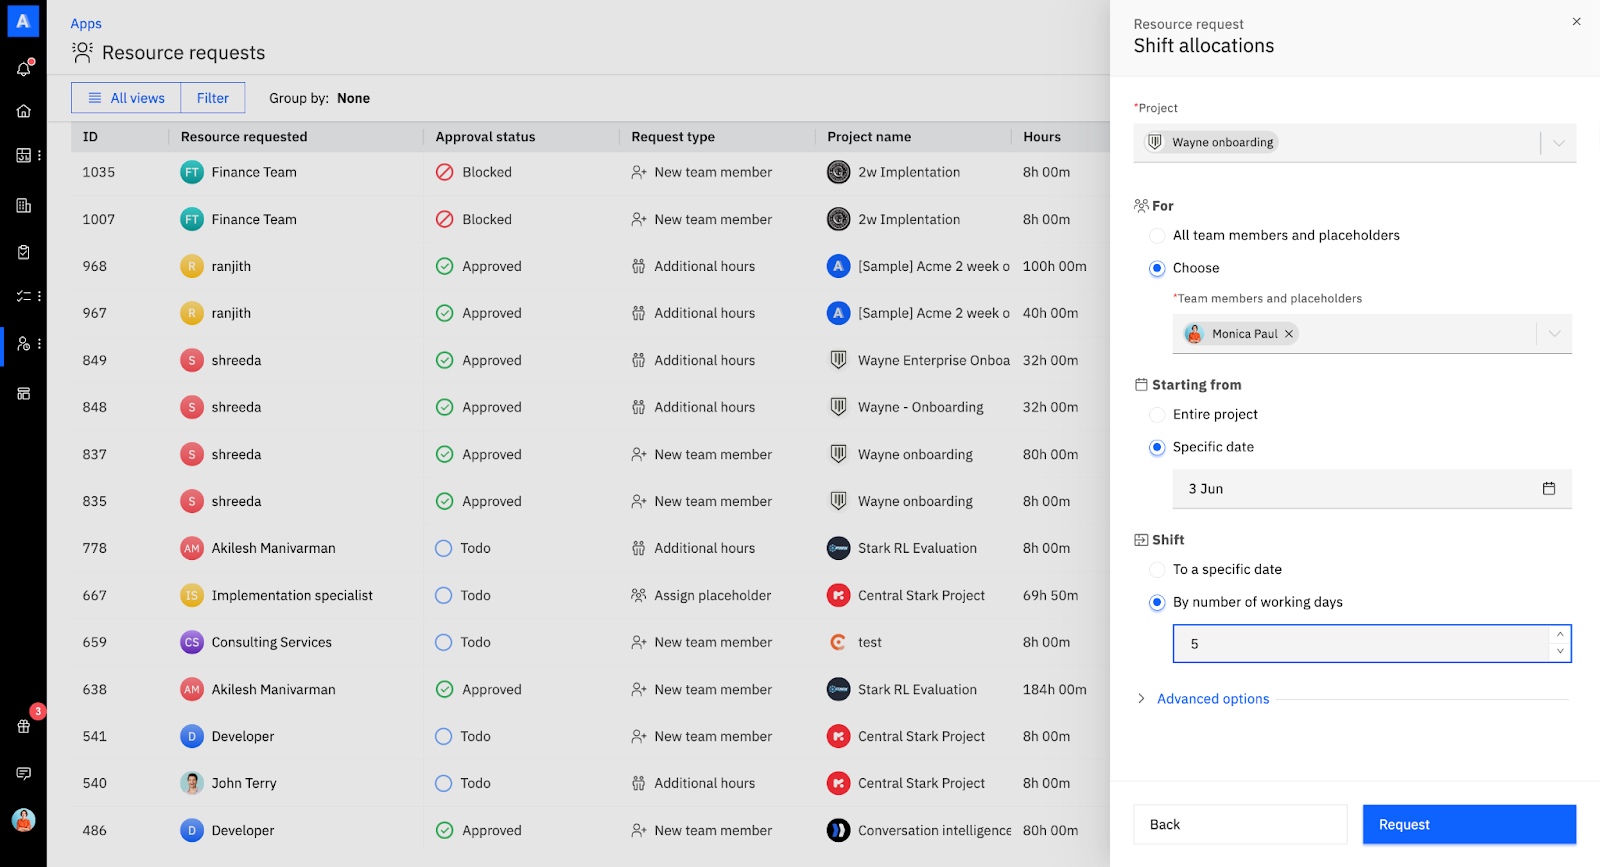
Shift allocations
Use this request when you need to postpone a project activity or shift an entire project timeline. You can shift allocations for a specific phase, activity, team member, or for all team members involved in the project.
You can reschedule allocations to a specific date or extend the timeline by a certain number of days.
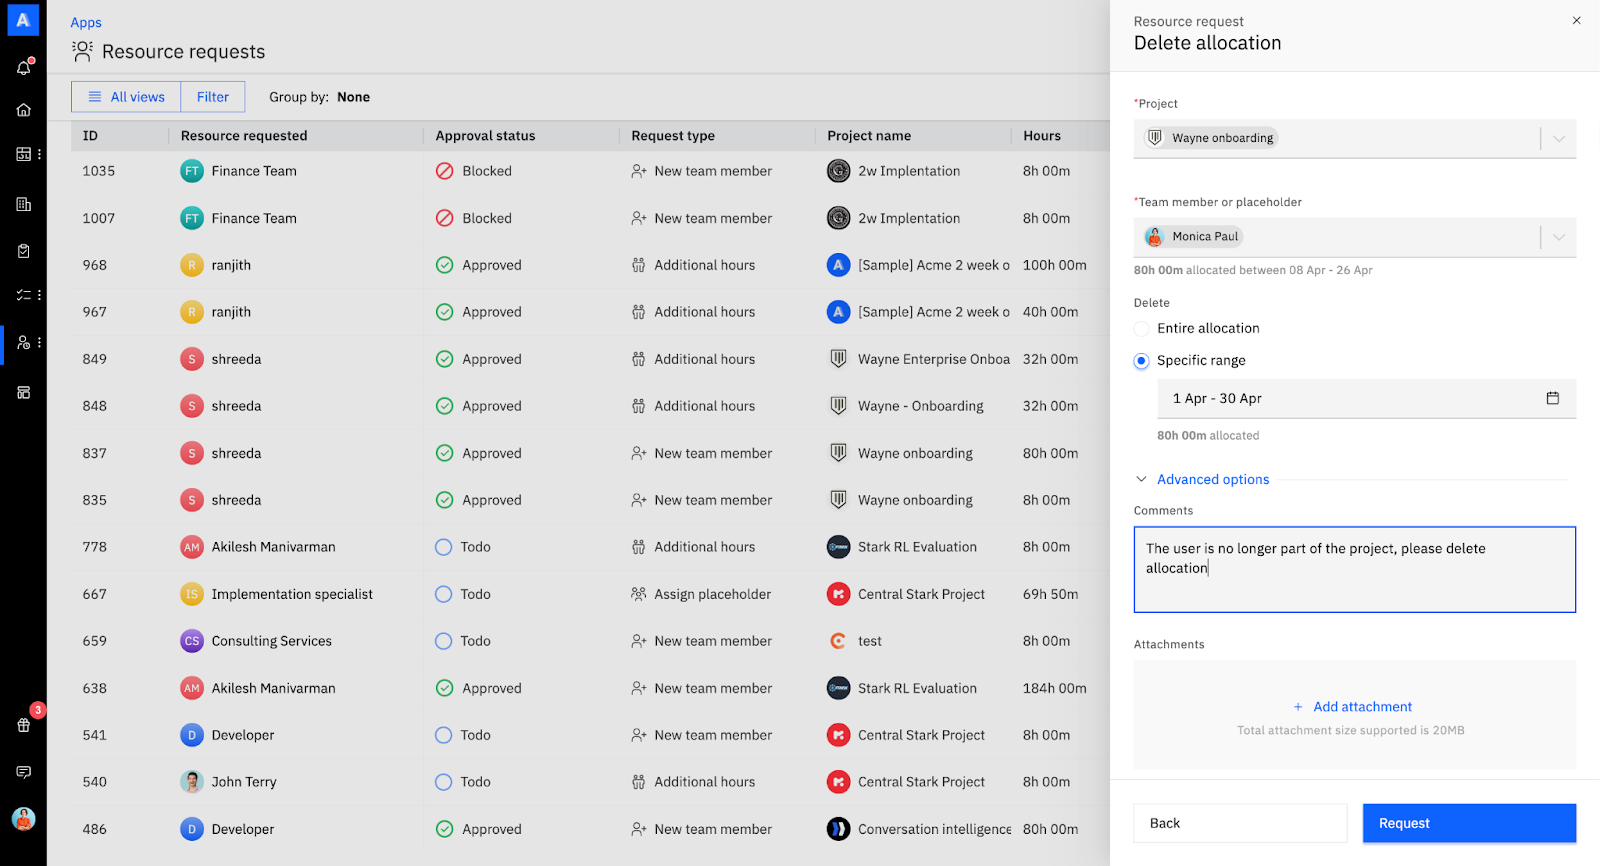
Delete allocation
Use this request when a role or team member is no longer needed for an entire project or for a specific period. Select the role or team member and specify the time frame during which their allocation should be removed.
Raise a resource request
The user raising the request should understand the skills and roles needed for the project. For example, a project manager may know that a project requires a business consultant with CRM integration experience, an operations manager with financial expertise, or an engineer for custom development.
Resource requests can be raised in two ways:
- From Resource Management
- From within a project
Option 1: Raise a request from Resource Management
- Go to Resource Management > Apps > Resource Request.
- Click New Request.
- Choose the request type, such as New team member, Assign placeholder, Additional hours, Replace resource, Shift allocations, or Delete allocations.
- Fill in the request details, such as project, team member or role, allocation method and type, dates, and requested hours. You can add multiple entries for different time ranges.
- Use the Timeline View toggle to visualize how the request would impact the project schedule.
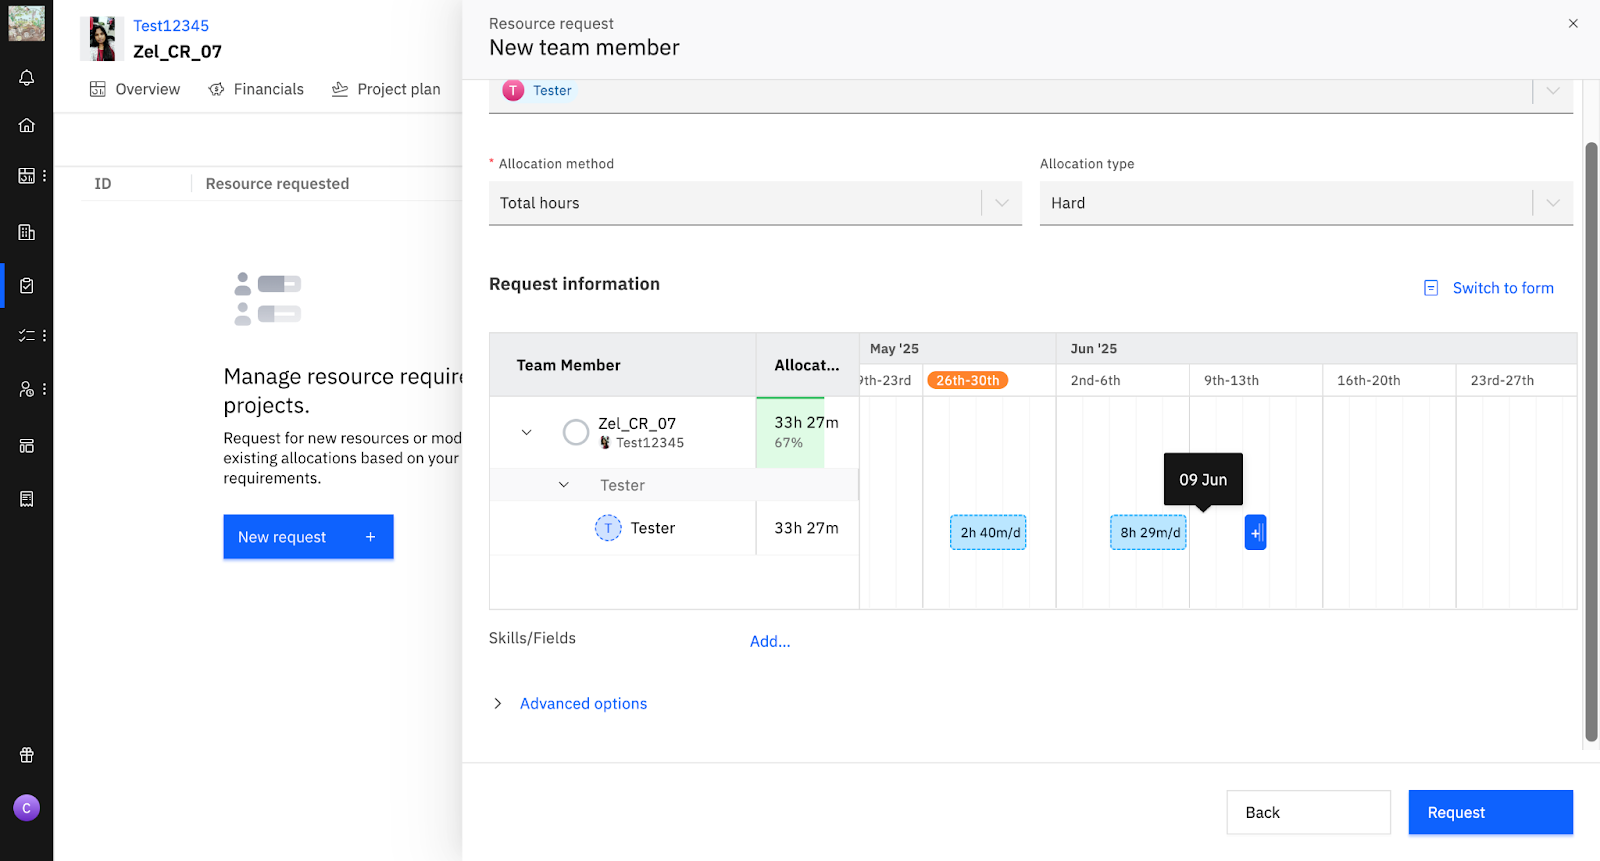
- Add skills, region filters, and optional context in the comments field.
- Click Request to submit.
Option 2: Raise a request from a project
- Open the project.
- Click the Resource Management tab.
- Select Resource Request.
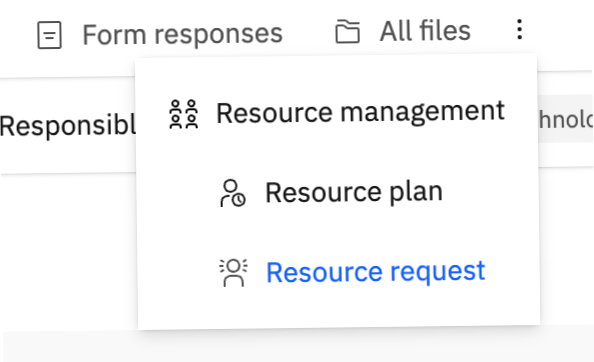
- Follow the same steps to fill in and submit the request.
Resource request list page
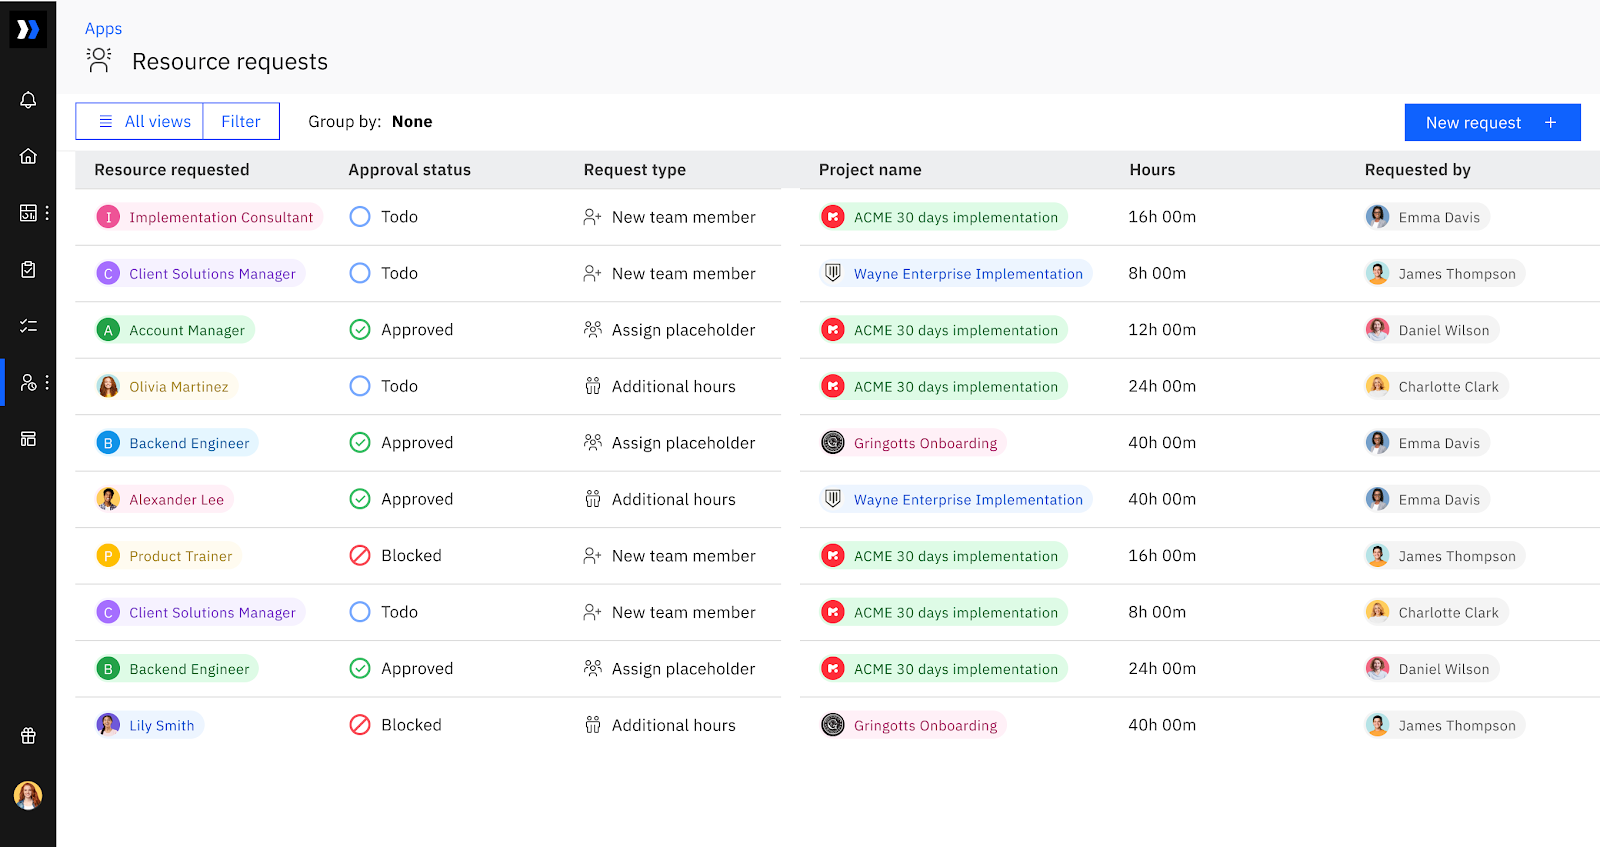
The resource request list page gives requestors a centralized view of all requests raised for assigning new team members, placeholders, additional hours, and other allocation changes.
Check the status of past requests
The resource request list page shows all requests, with the most recent requests first. You can sort requests by the Requested on field to bring older requests to the top.
Use filters and grouping
You can filter requests by conditions such as request type, request status, or project name. You can also save filtered views and revisit them later.
Grouping requests by type, project, date, or status helps you track resource request progress.
To customize the Resource requests table, click the Manage columns icon in the top-right area of the table. In the Manage columns modal, select or deselect columns using the checkboxes, drag selected columns to rearrange their order, and click Done to save the table view.
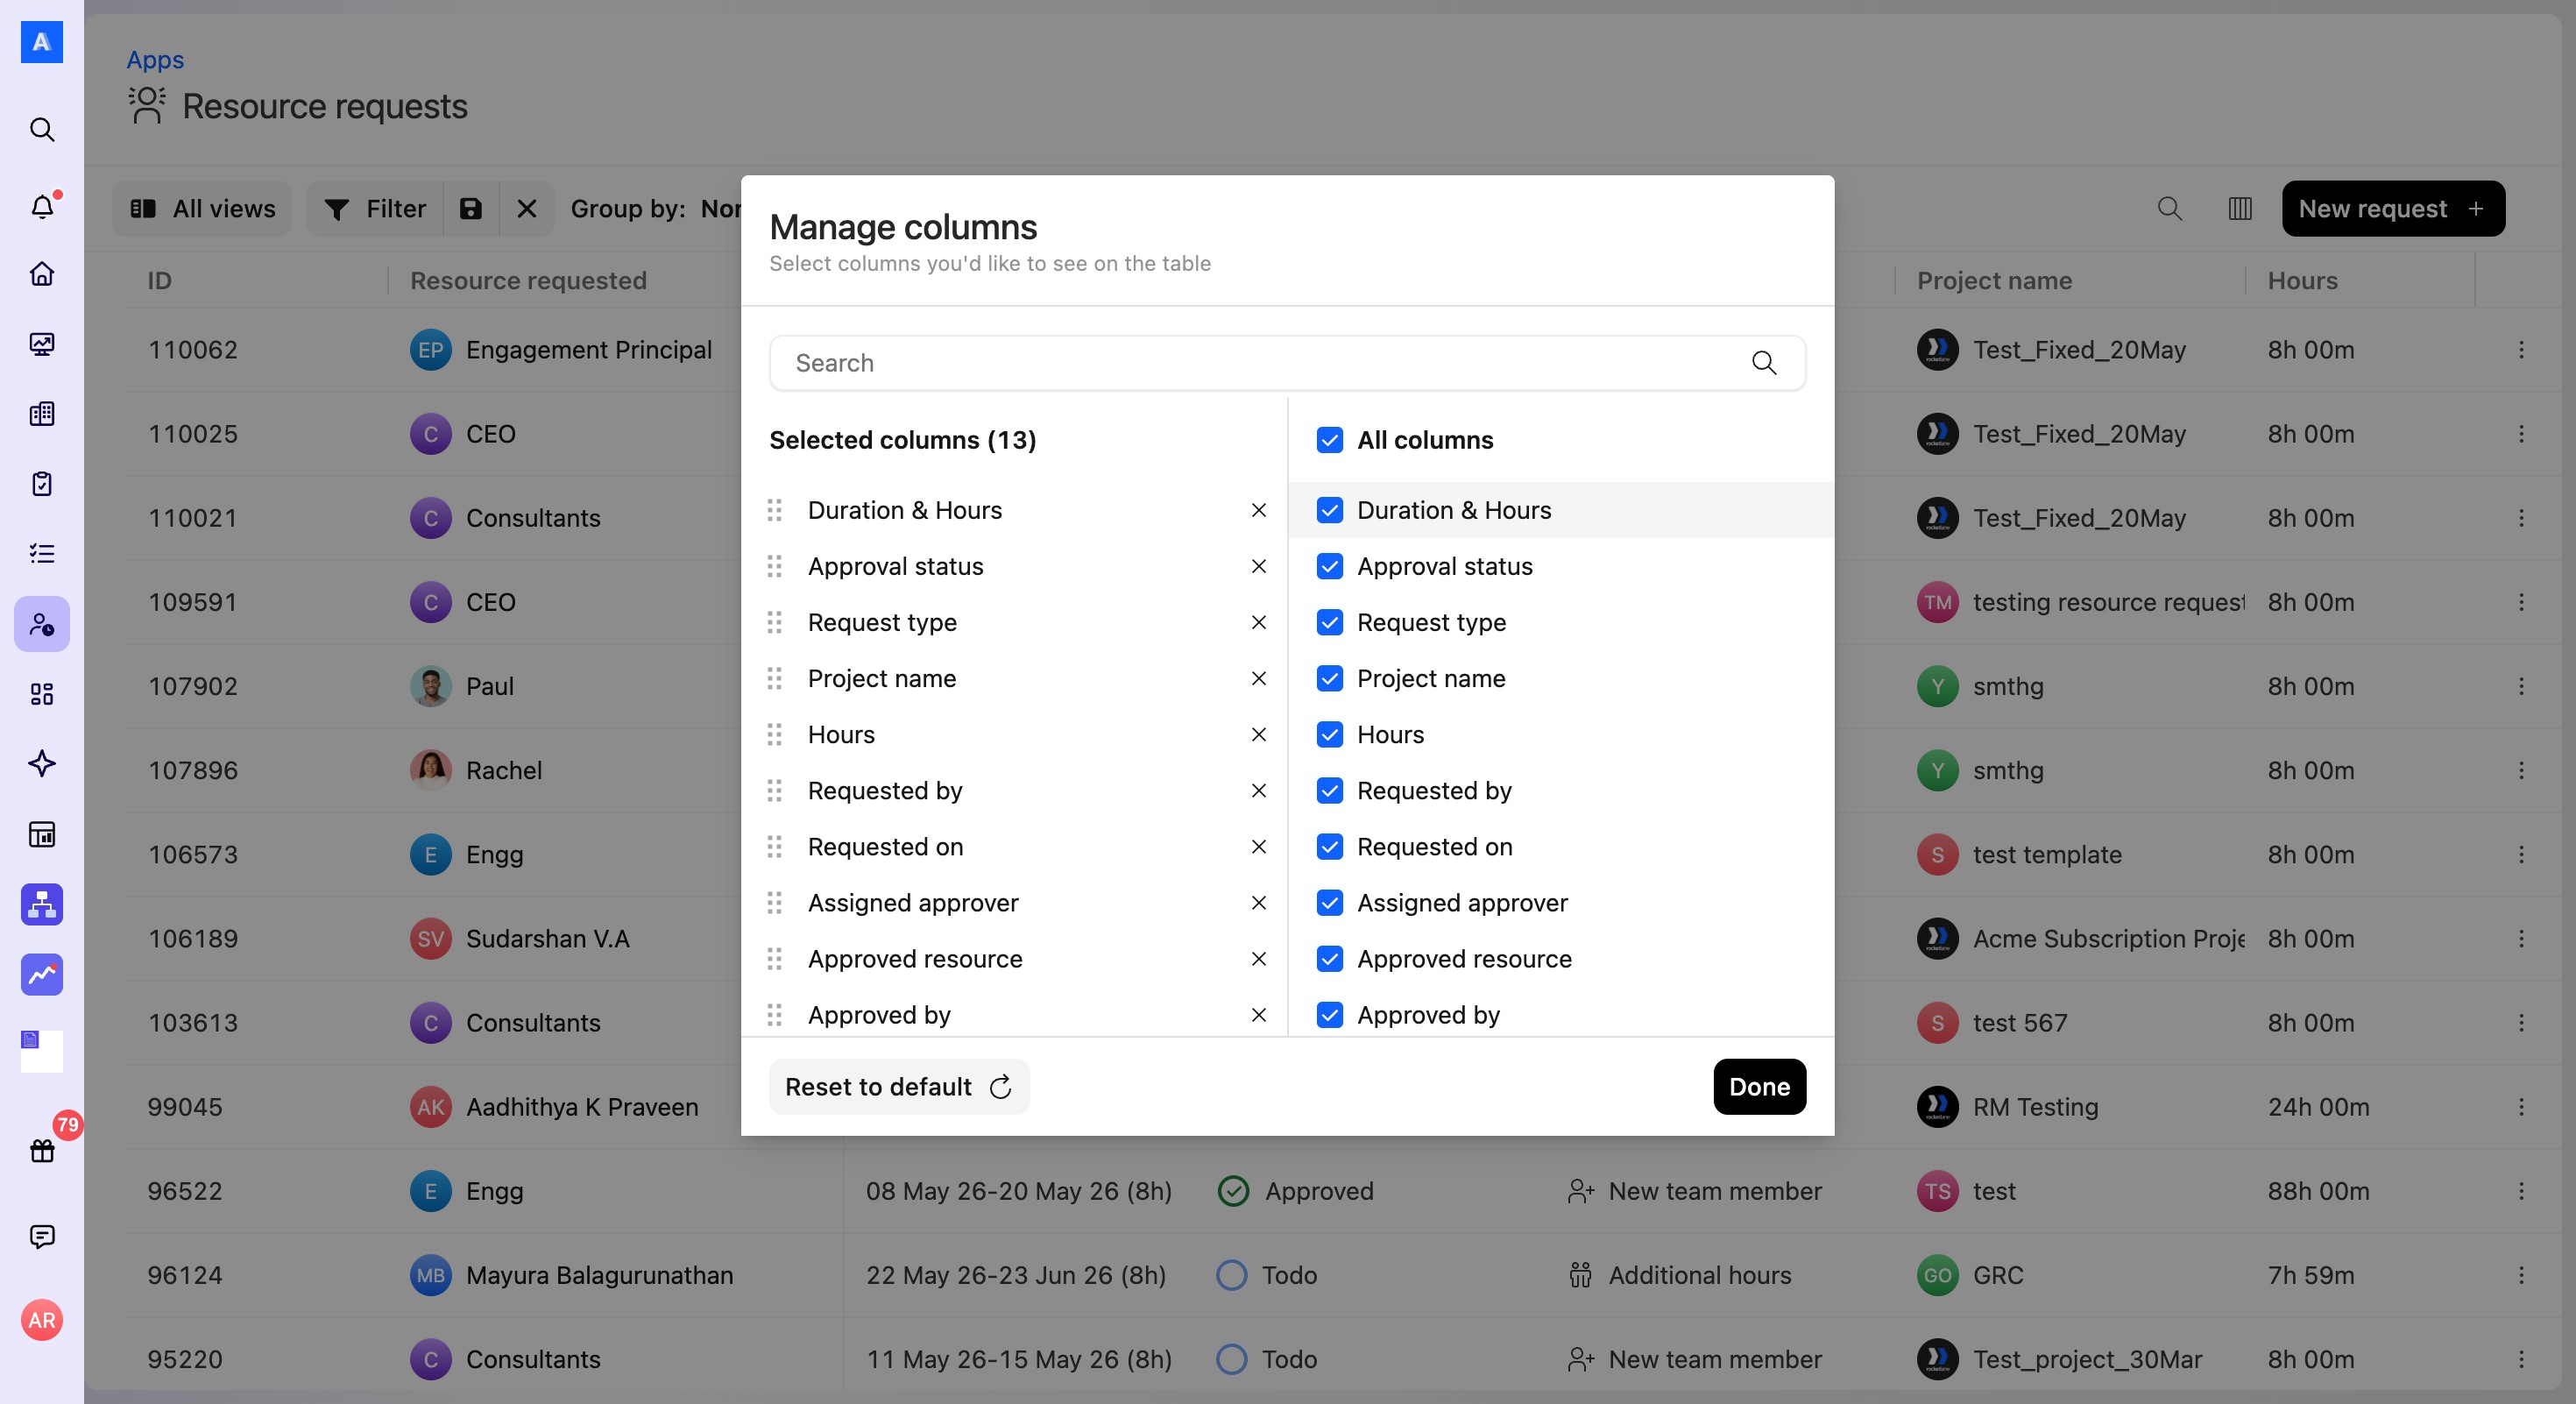
For example, you can filter projects with the name Acme and ARR greater than 10k, and then group the requests by type to view all resources that were blocked.
View and edit a resource request
You can modify an already submitted resource request. This is useful when a request is blocked or when you need to adjust the requirements.
To edit a request:
- Click any request from the request list page.
- Click Edit request.
- Add or remove information, skills, or fields as needed.
- Click Request to save your changes.
View approved requests
After a request is approved, you can find it from the resource request list page. You can also create a custom view by filtering approved requests and saving it as a private or shared view.
To view the details of a request, click the request to open it. You can see all the requirements mentioned when the request was raised. After approval, Rocketlane shows which requirements were met and which requirements were not met.
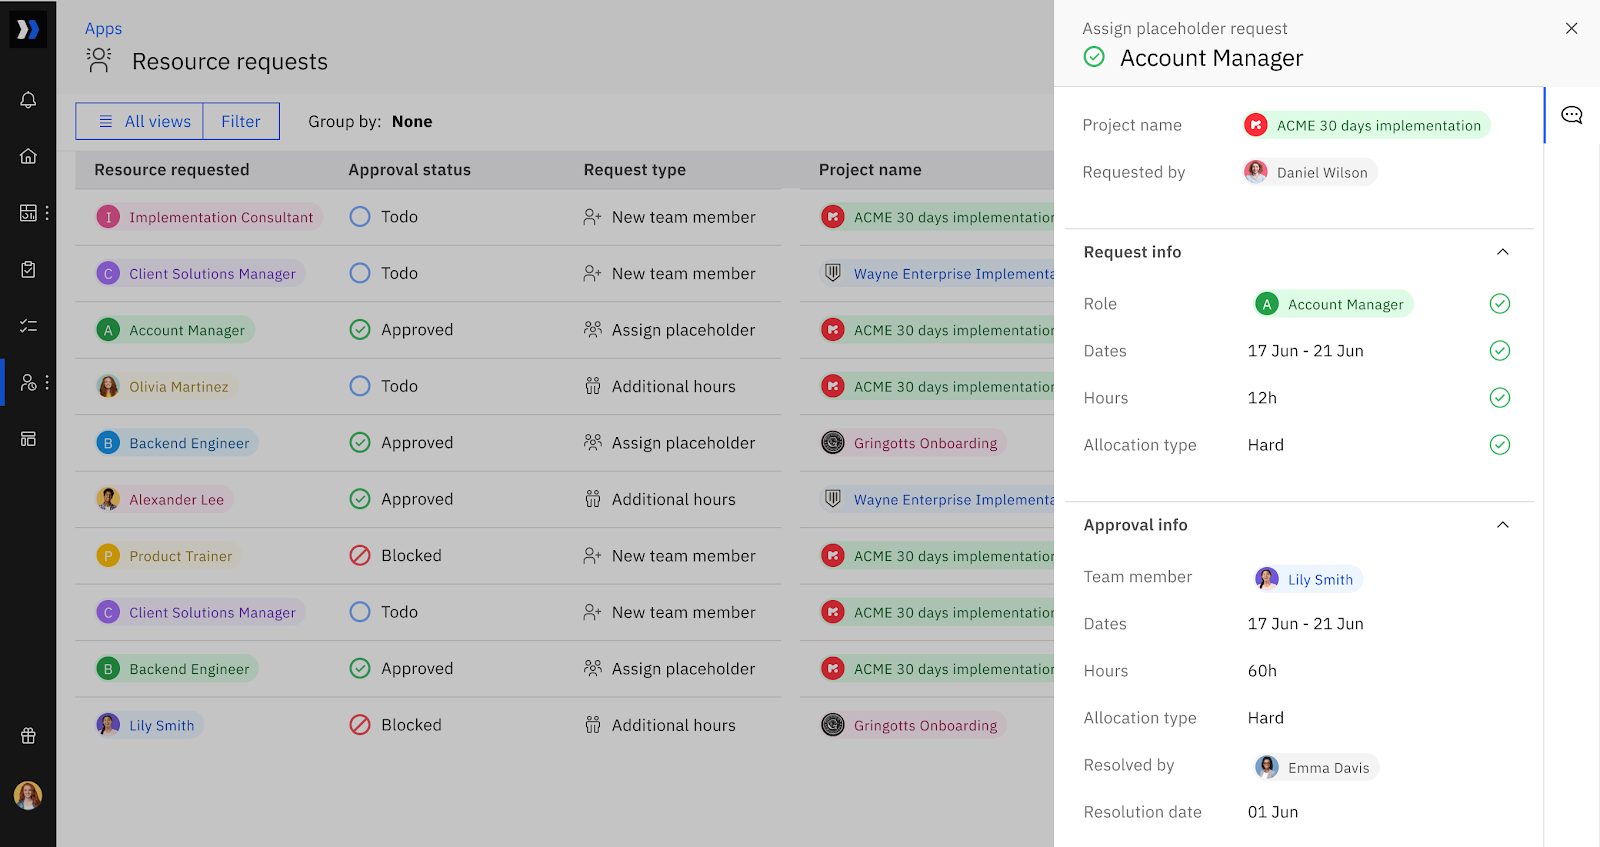
View blocked requests
If a request is blocked due to over-allocation or unavailability of resources with the required skills, you can find it in the resource request list page with a blocked status.
You can initiate a conversation from the resource request window and edit the request to accommodate another resource.
Delete a resource request
To delete a request:
- Select a request from the request list page.
- Click the three dots (...) menu near the request for more actions.
- Click Delete.
Resource approval for approvers
Approvers can review resource requests from a centralized approval view. They can filter and group requests by request type, status, project, date, and other fields.
Approvers can customize the Approve resource requests table with the Manage columns icon. In the Manage columns modal, select or deselect columns, drag selected columns to rearrange their order, and click Done to save the approvals table view.
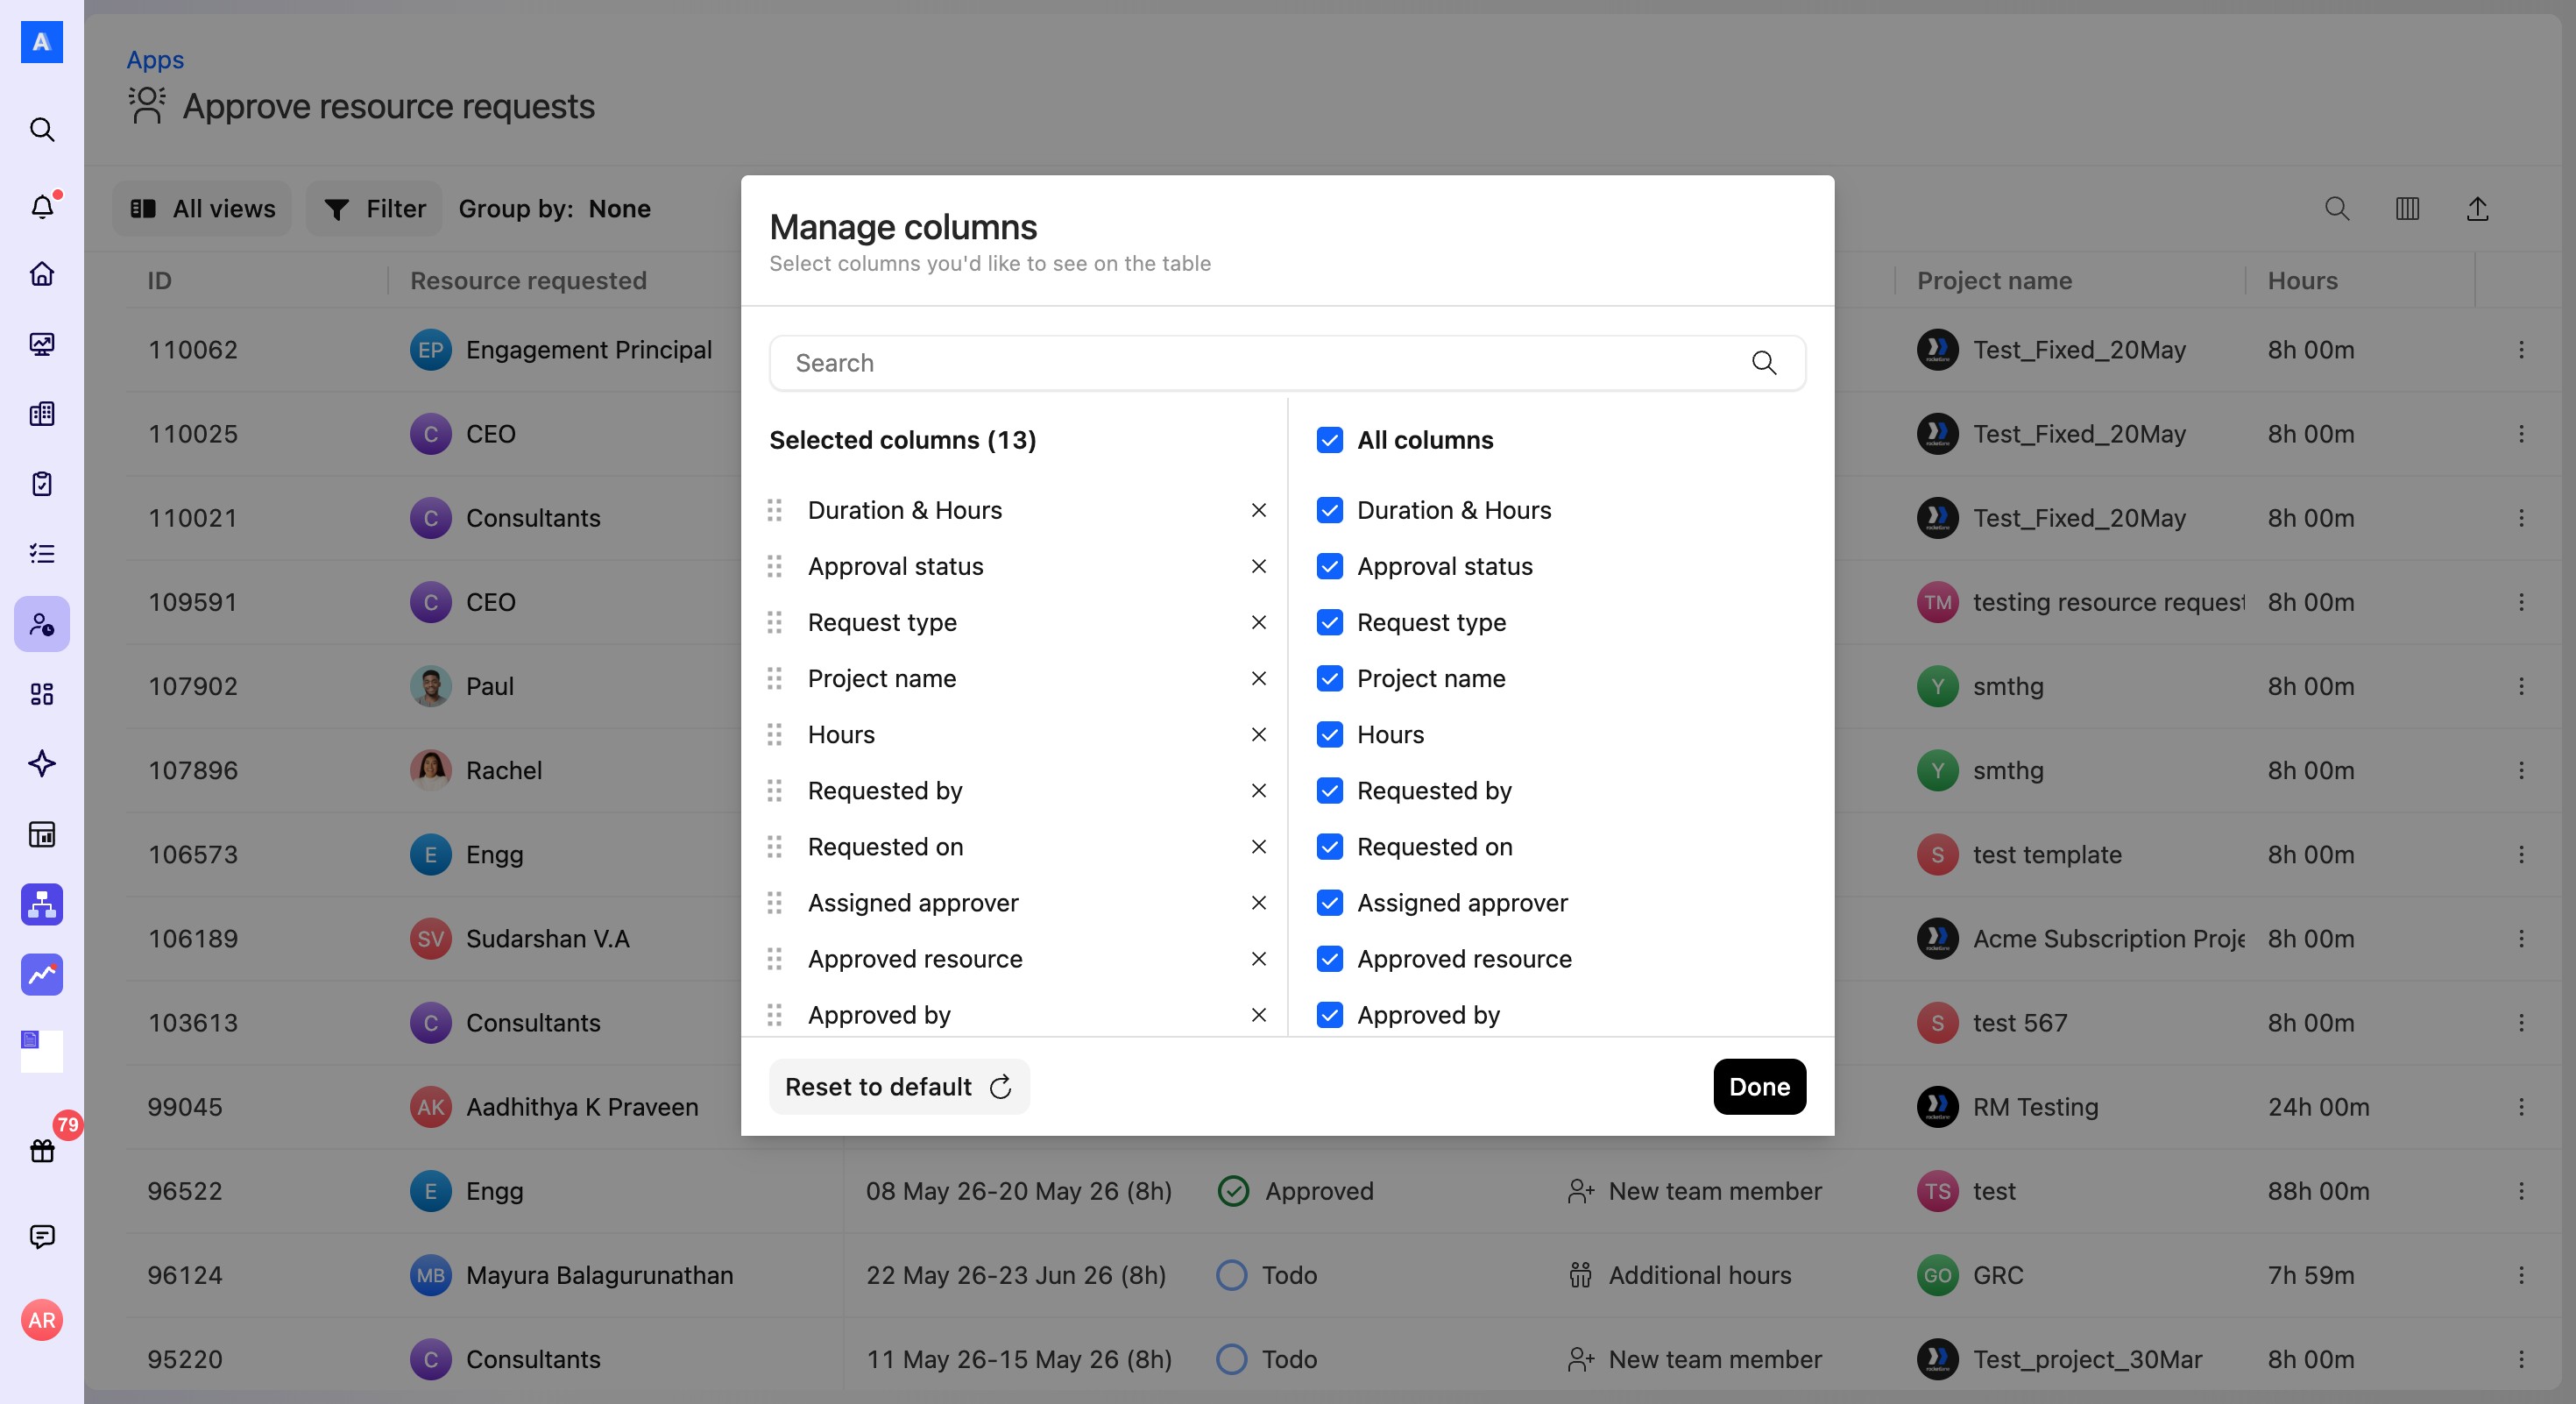
Approve a resource request
- Go to Resource Management > Apps > Approve a request.
- Click any request to open it.
- Review the request details, including approver, project name, project hours, fixed fee or budget, requirements, and project information.
- Use the approval view to review requested allocations and available resources.
- Select a team member from the relevant matches.
- Approve the request, block the request, or assign a placeholder if no suitable team member is available.
Approval view behavior
- The Timeline view for approvers focuses only on the requested allocations and is scrollable within the requested timeline.
- When viewing a user’s allocations in the Timeline approval view, all projects with allocations are displayed based on the user’s permissions within the requested timeline.
- Assigning a Placeholder request for a placeholder with multiple existing allocations in the project defaults to multi-block mode for both requestors and approvers.
- Users in the approval view are sorted alphabetically by name instead of by user ID.
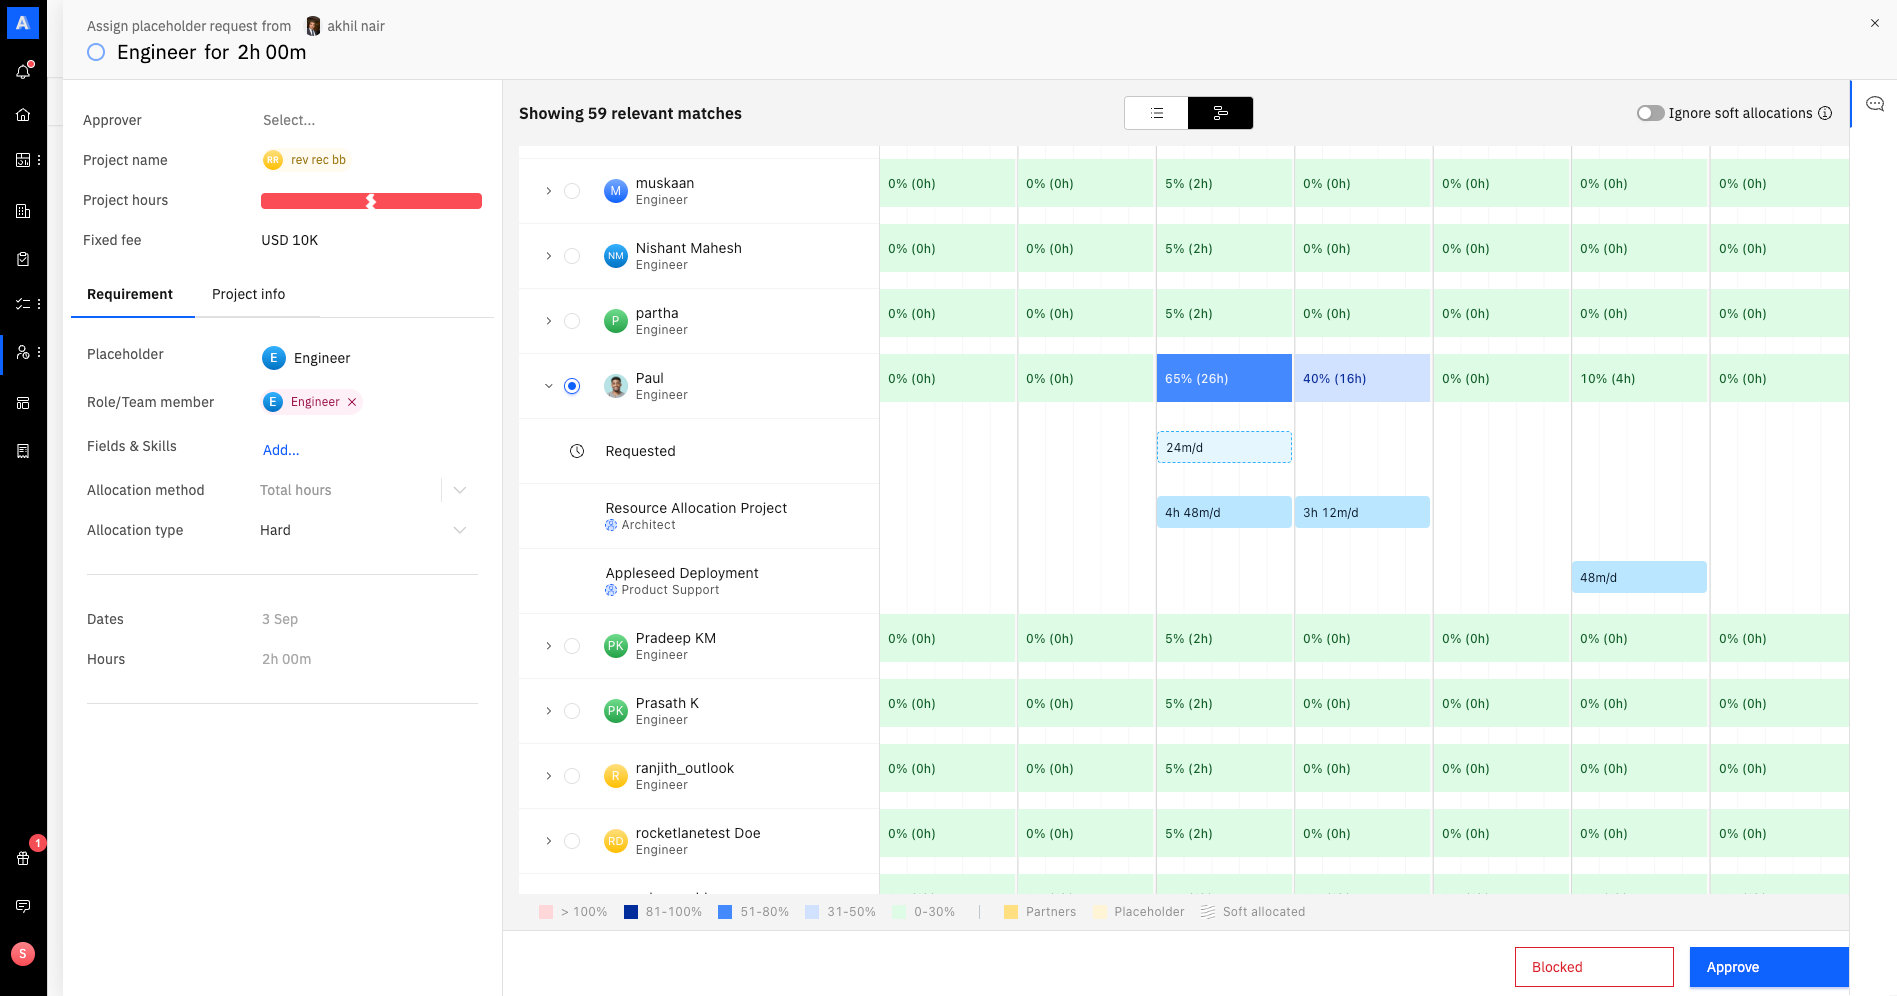
Relevant matches
Rocketlane suggests relevant matches based on the request details, such as the role, skills, and other criteria added by the requester.
- Forecasted utilization: The utilization percentage after considering existing allocations and the additional time being allocated.
- Overall allocation: The total hours allocated for the resource if they are assigned to the request.
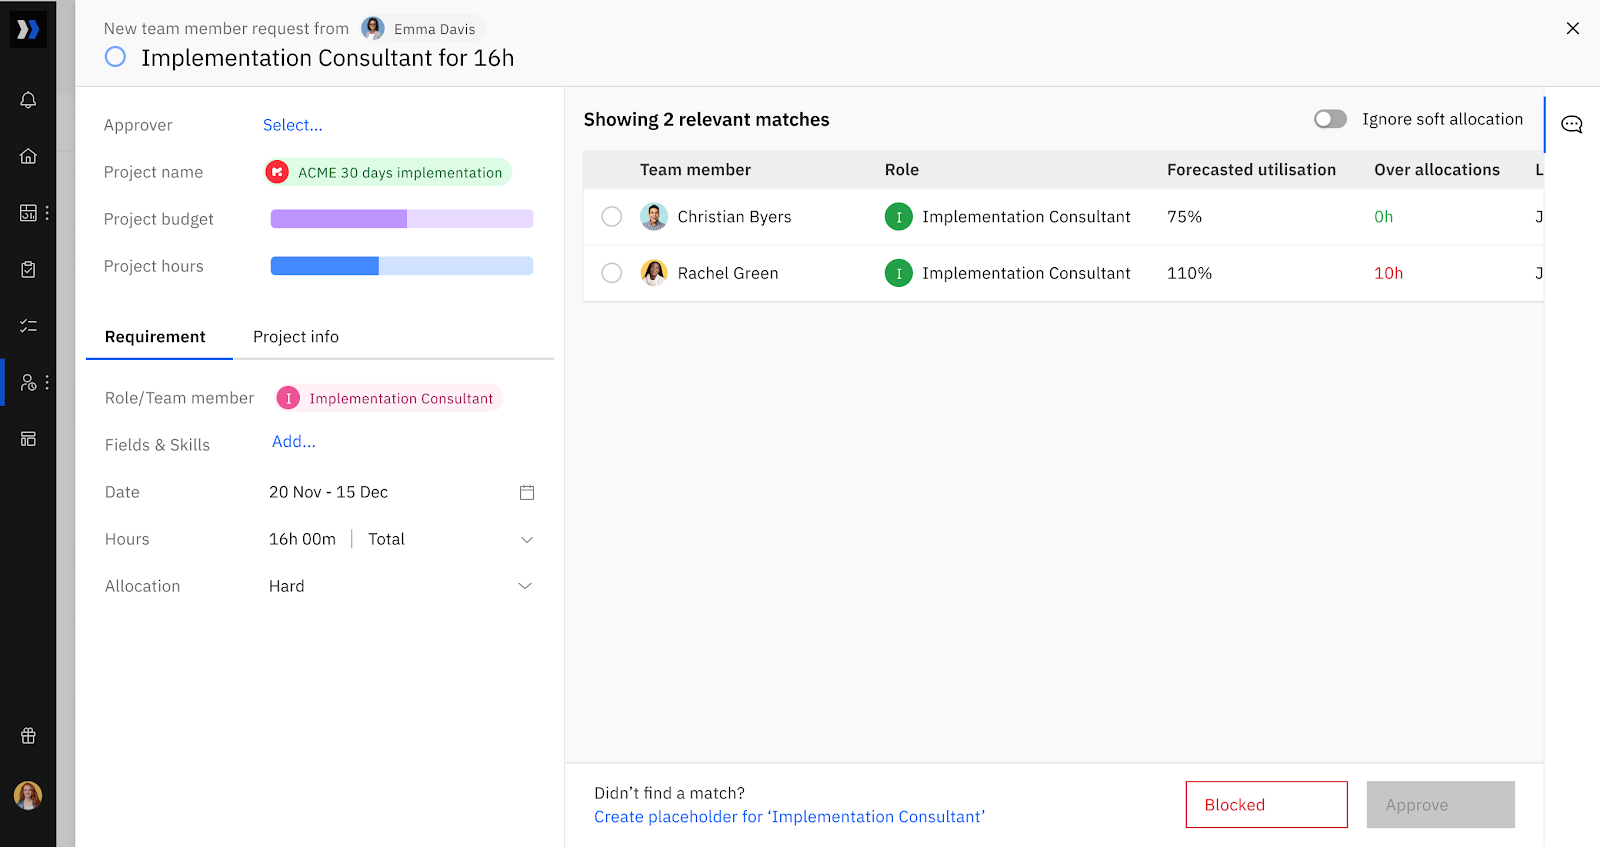
Select a team member
You can choose a team member based on their forecasted utilization and over-allocation, if any. If you find a relevant match, assign the team member. If no match is available, you can assign a placeholder or block the request with a reason and start a conversation in the resource request window.
Ignore soft allocation
If a user’s projected allocation is high, it may be because of soft allocations. You can use the toggle to ignore soft allocations and view updated figures.
Edit the request before approval
If the specified requirements are not met, you can edit the request to check for resources who meet most of the requirements.
- If a resource request is edited before assigning a resource, any edited fields that are not met by the resource are flagged in red.
- You can create a placeholder for a request to temporarily allocate an unnamed resource.
- You can use Timeline View to understand allocation impact before and after the allocation.
Multiple approvers for resource requests
Resource requests can be configured with more than one approver. This helps prevent staffing requests from being blocked when a single approver is unavailable and ensures approvals can move forward without delays.
How multi-approver requests work
- One or more approvers can be assigned to a resource request.
- Notifications are sent to all assigned approvers once approvers are assigned.
- Any one approver can take action.
- The first approval or block resolves the request.
Add multiple approvers manually
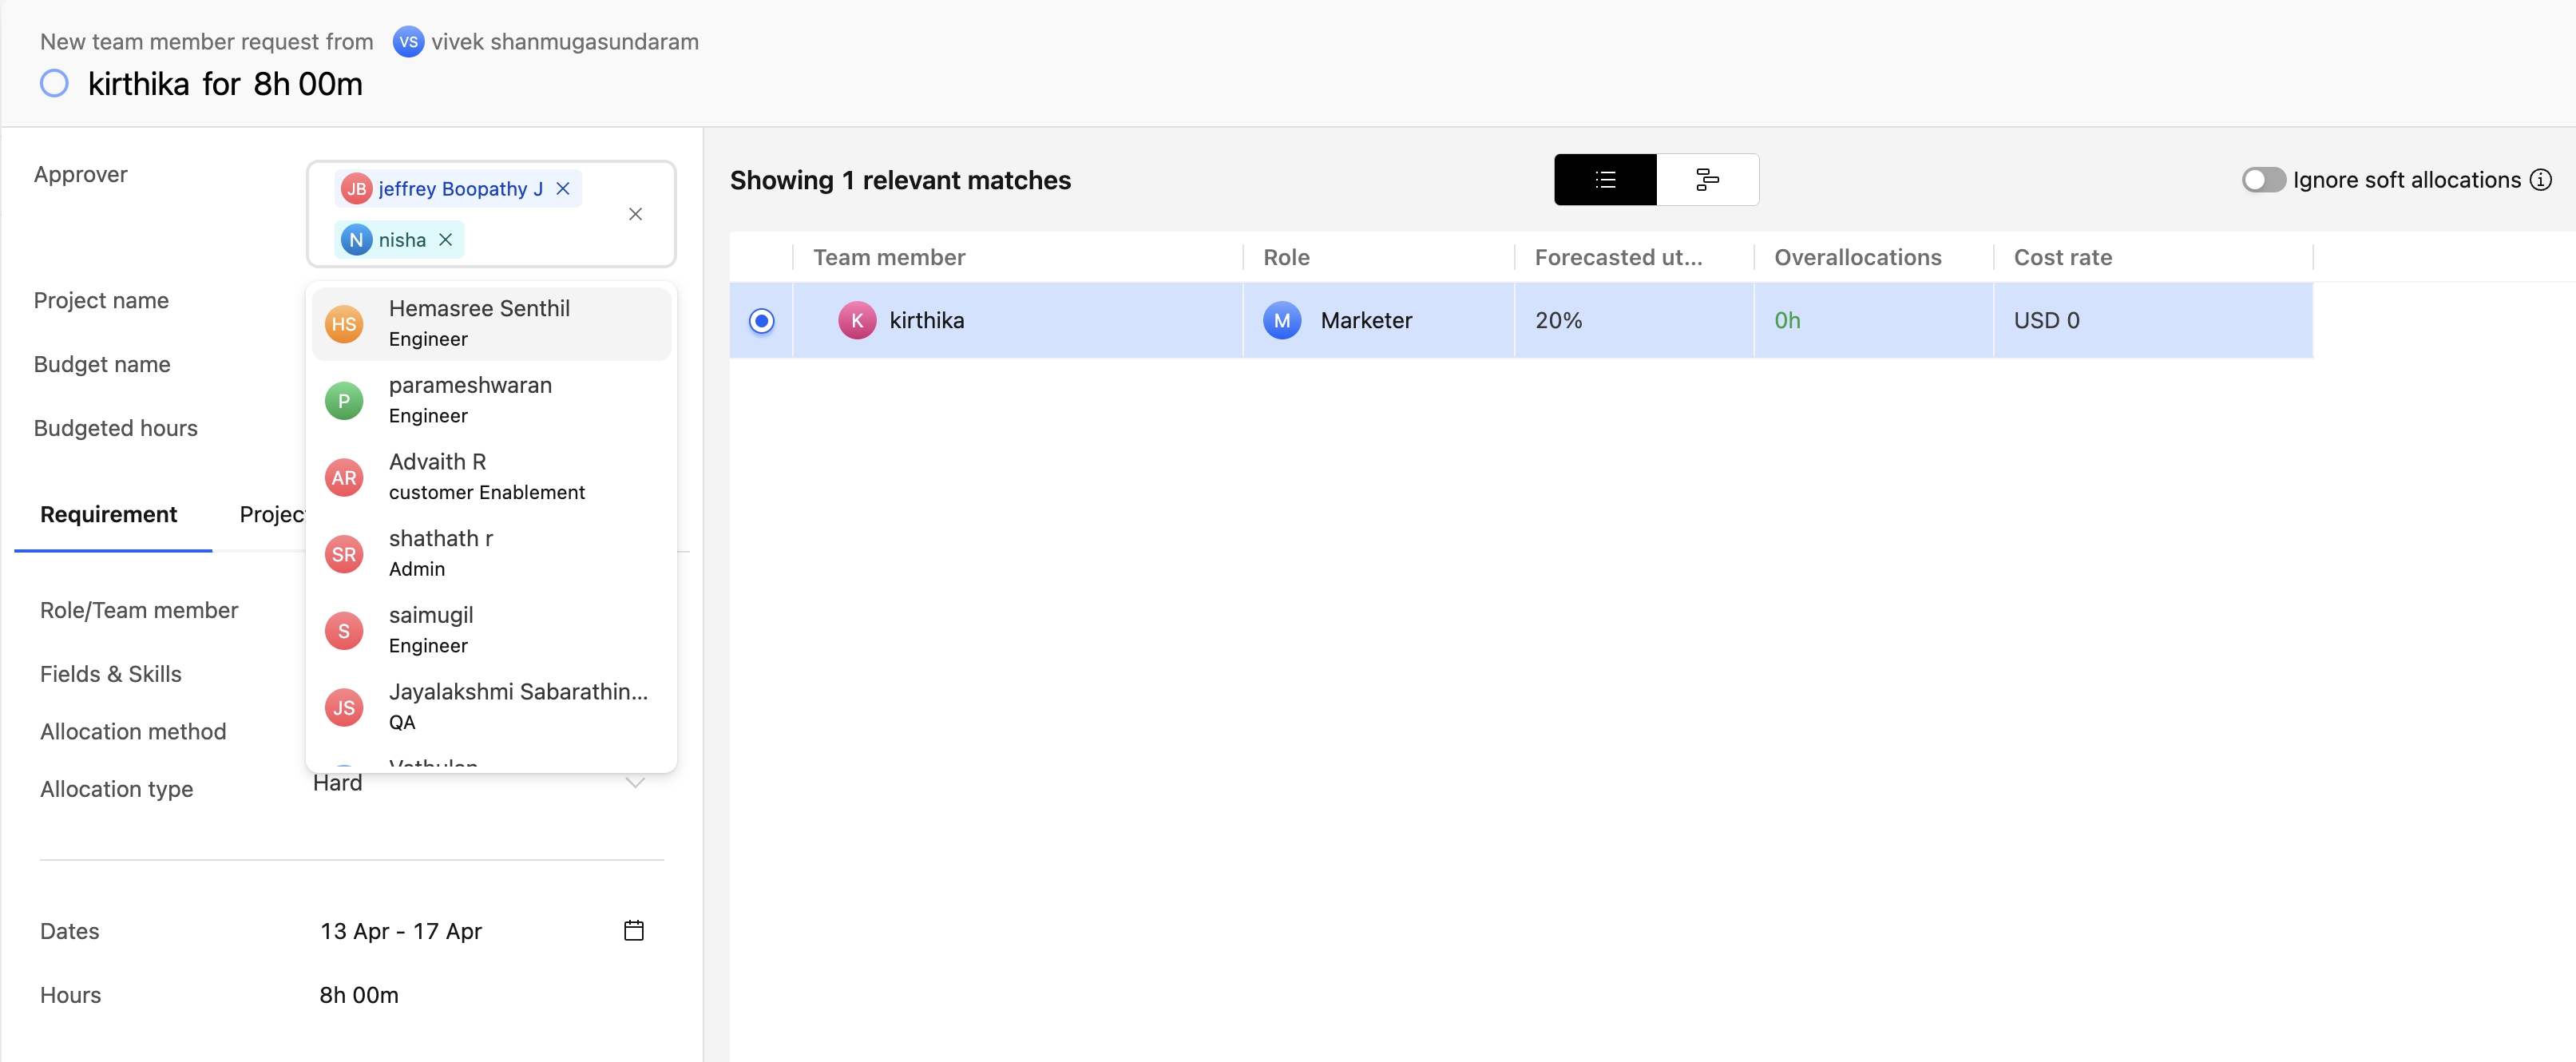
In the manual flow, approvers are assigned from the approvals queue after the request is raised.
- Raise the request from the Resource Request page.
- Go to Resource Management > Apps > Approve a request.
- Open the submitted request.
- In the Approver field, select one or more approvers.
- Once added, any approver can open the request and select Approve or Block.
- The first action taken resolves the request. No further action is required from other approvers.
Assign multiple approvers using automation
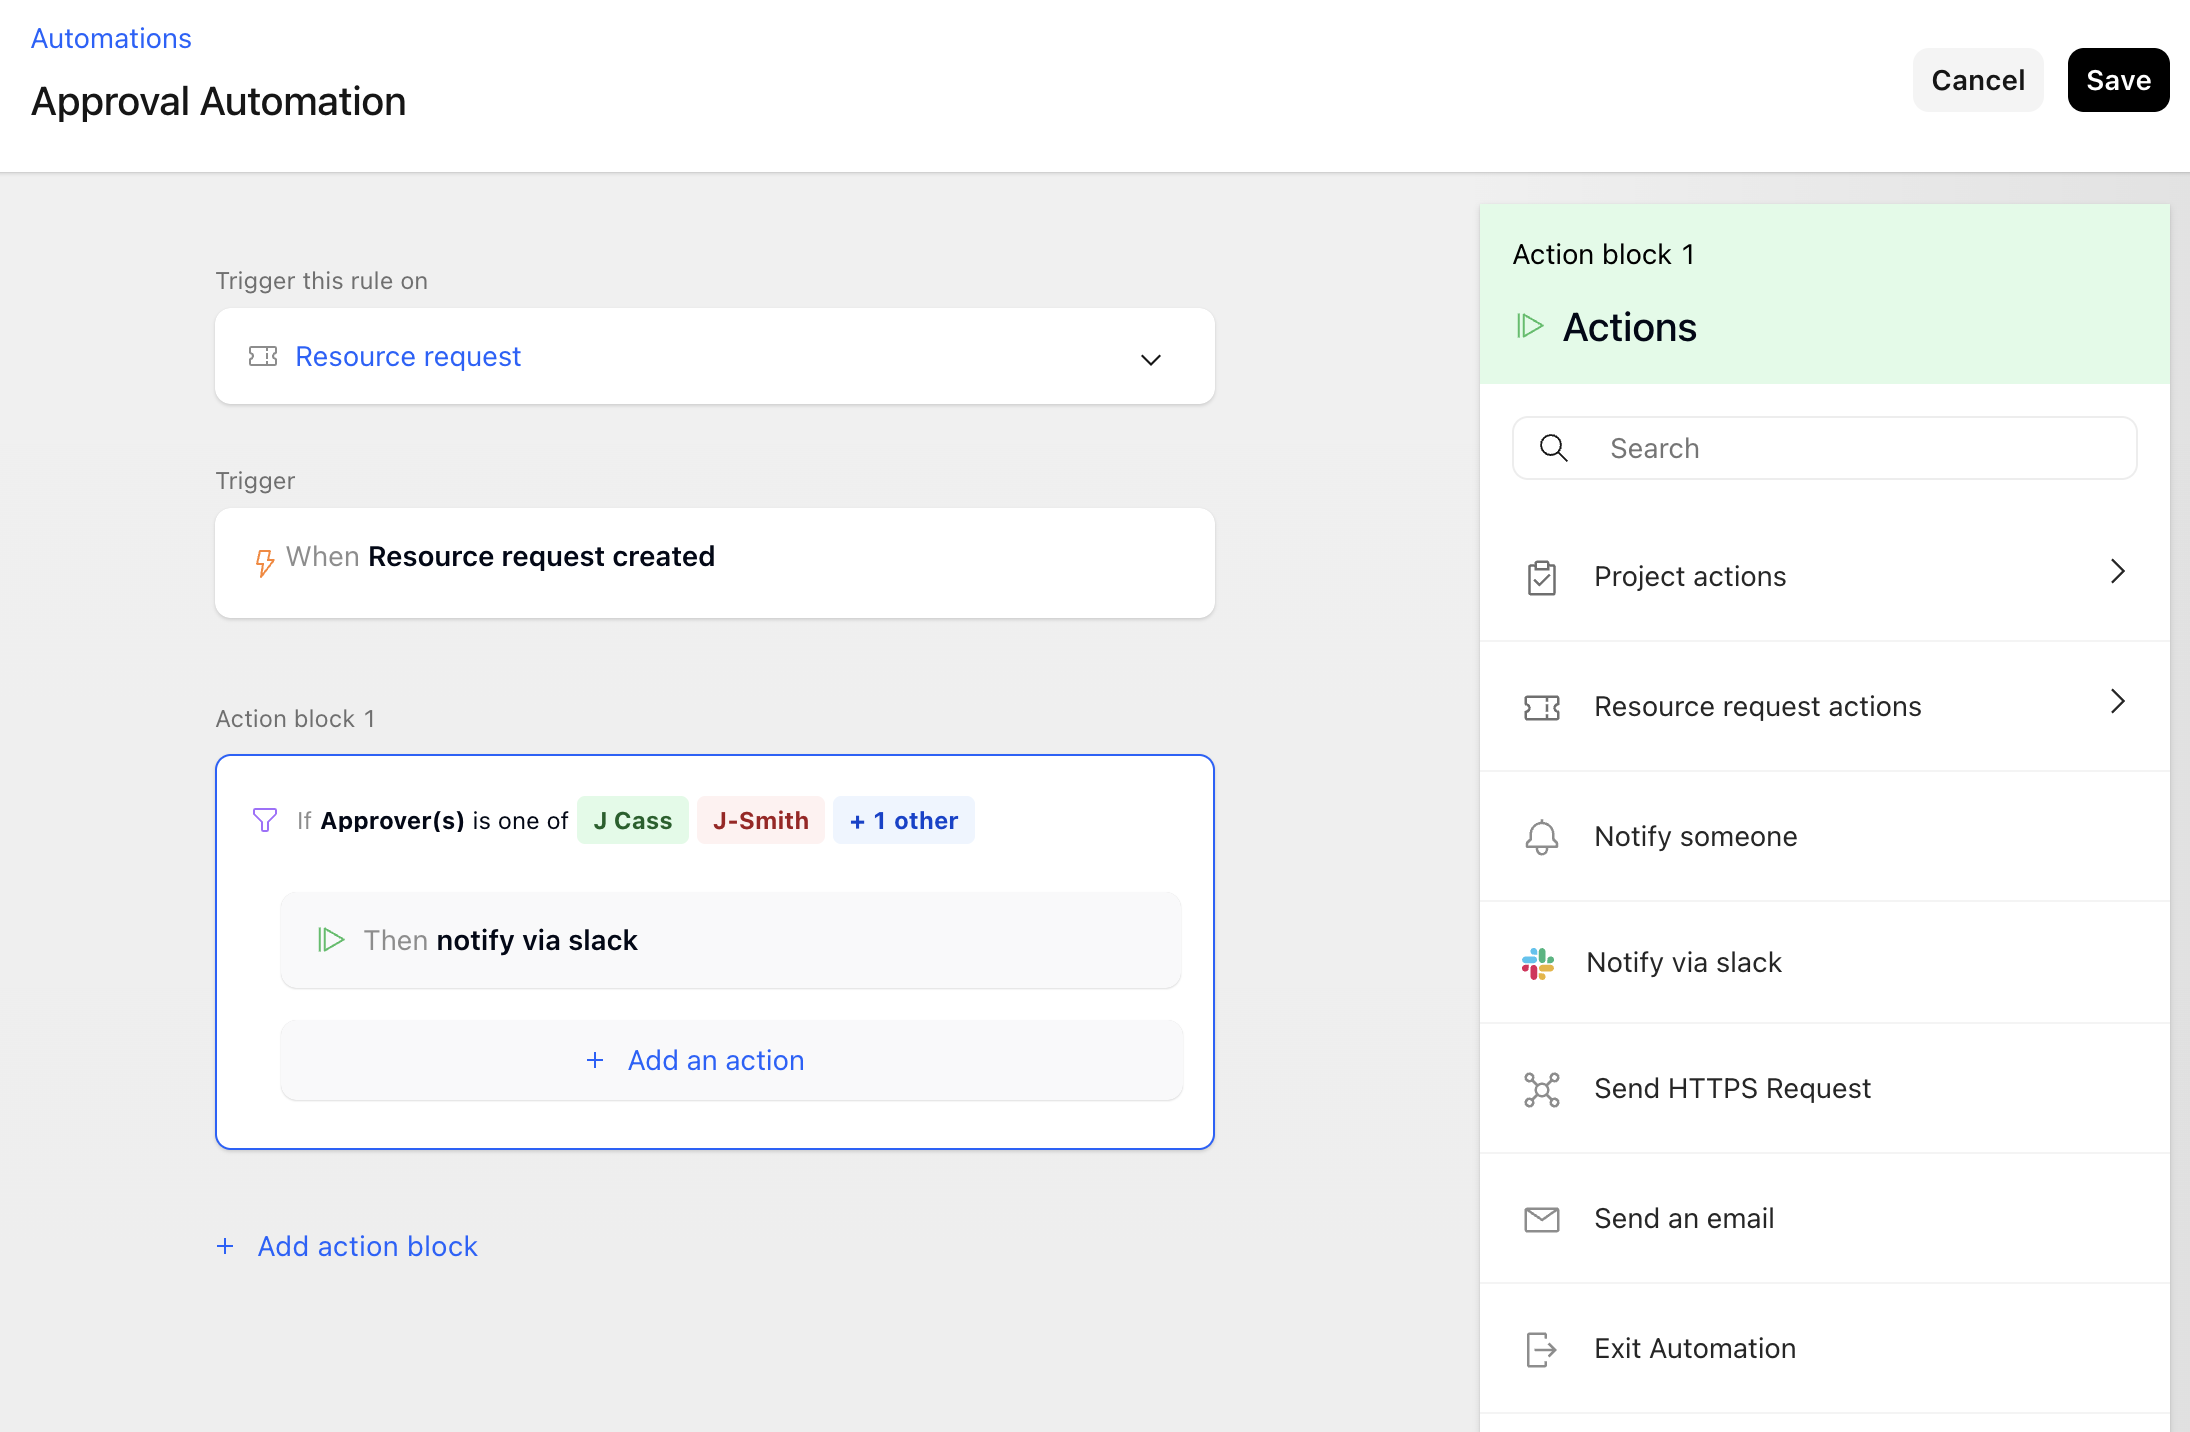
Automation rules triggered on resource request creation can assign multiple approvers.
- Go to Settings > Automations.
- Click Create automation.
- Set the trigger to Resource request.
- Add the required conditions, if applicable.
- Add the action Assign approver and select multiple approvers.
- Save the automation.
Approver experience
- Each assigned approver receives a notification when approvers are assigned.
- Approvers can approve or block the request from the approvals view.
- Once one approver acts, the request is resolved and does not require action from the remaining approvers.
Block a request
If you cannot find the right team member or if all suitable resources are over-allocated, you can block the resource request.
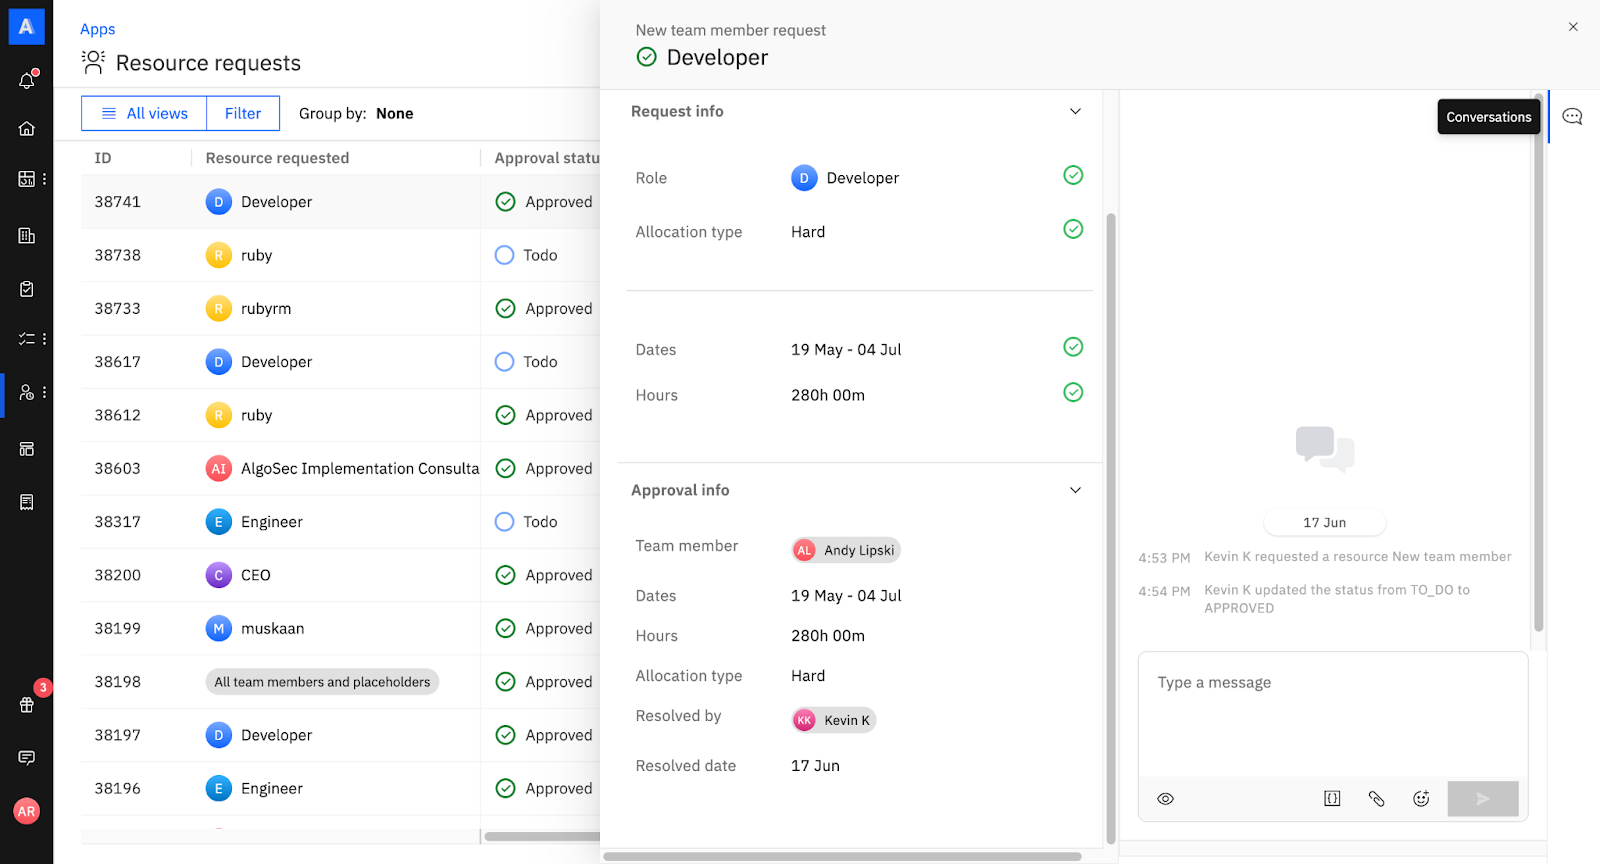
Use the conversation section within the resource request to send a message to the requester and mark the request as blocked.
Filter and view blocked requests
You can filter blocked requests by request status and save the filtered result as a view.
Automatically assign approvers to resource requests
You can use automations to assign approvers to resource requests when they are raised. You can also define conditions that must be met for the approvers to be assigned.
- As an admin, go to Settings.
- Go to Automations.
- Create a new automation and choose Resource request as the trigger.
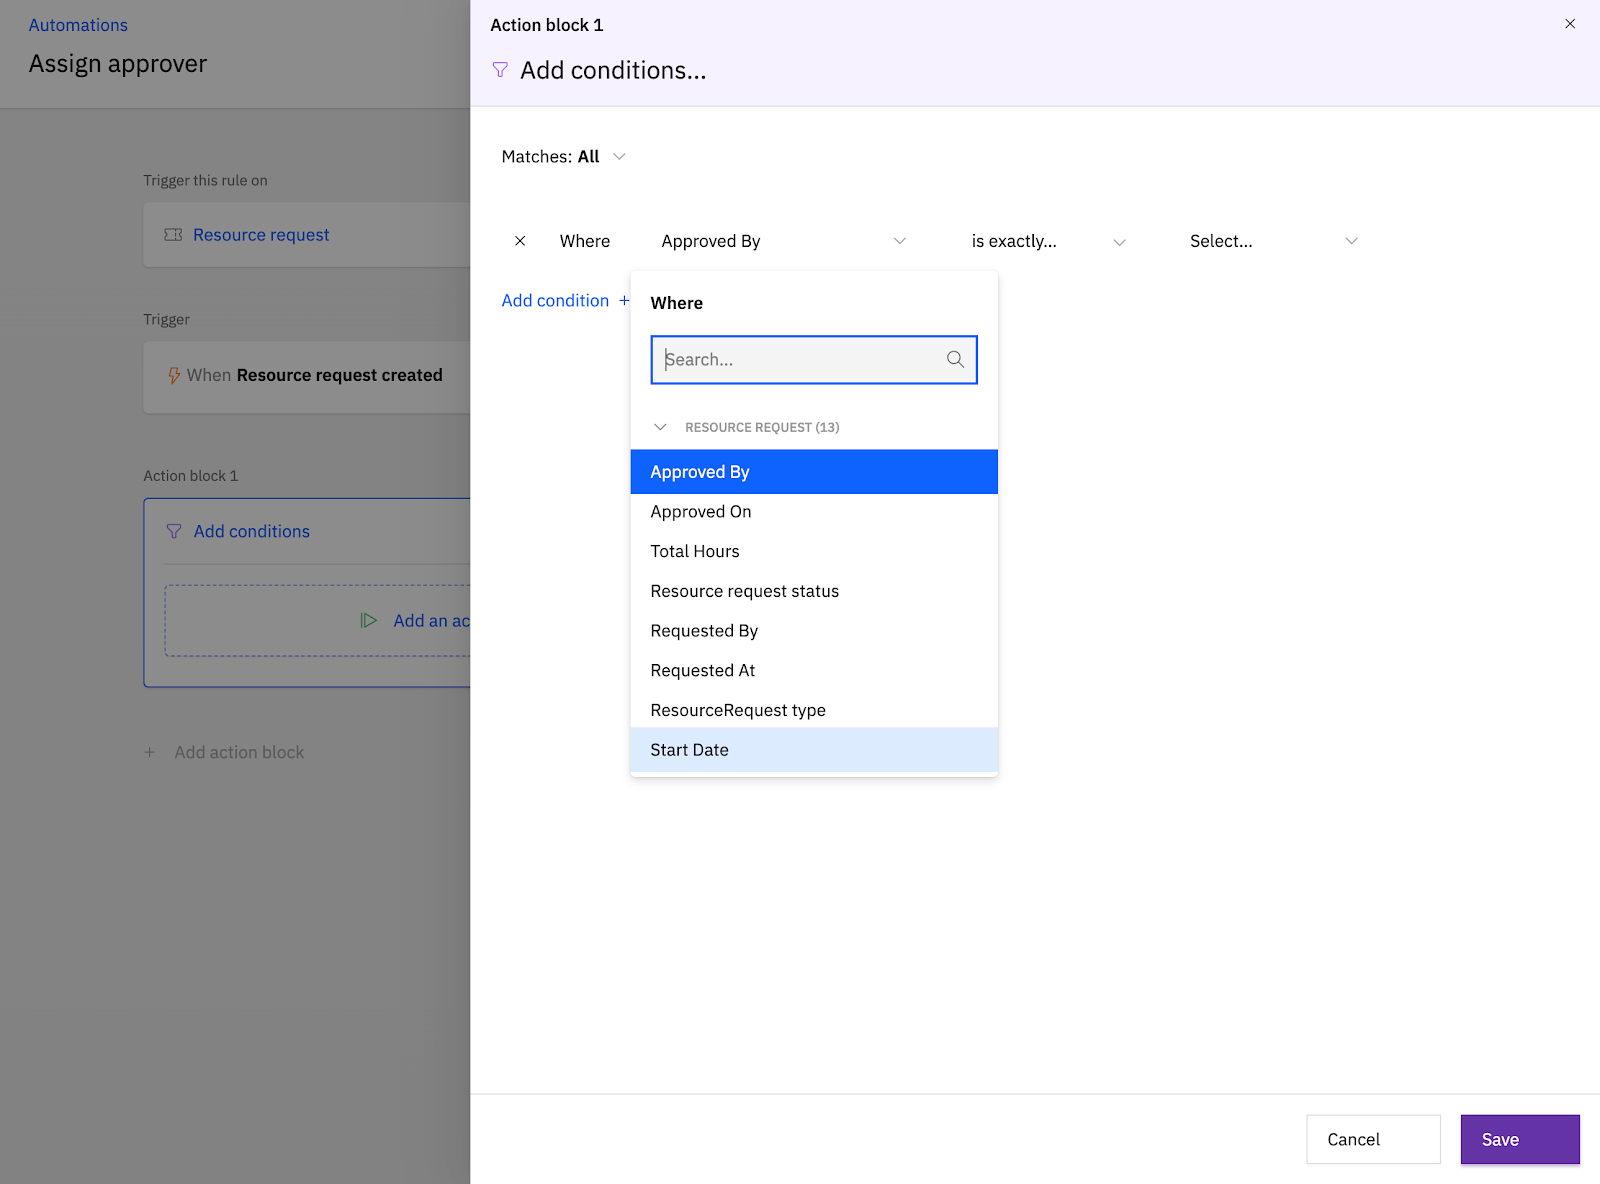
- Add conditions the automation needs to satisfy, such as Requested by or Project name.
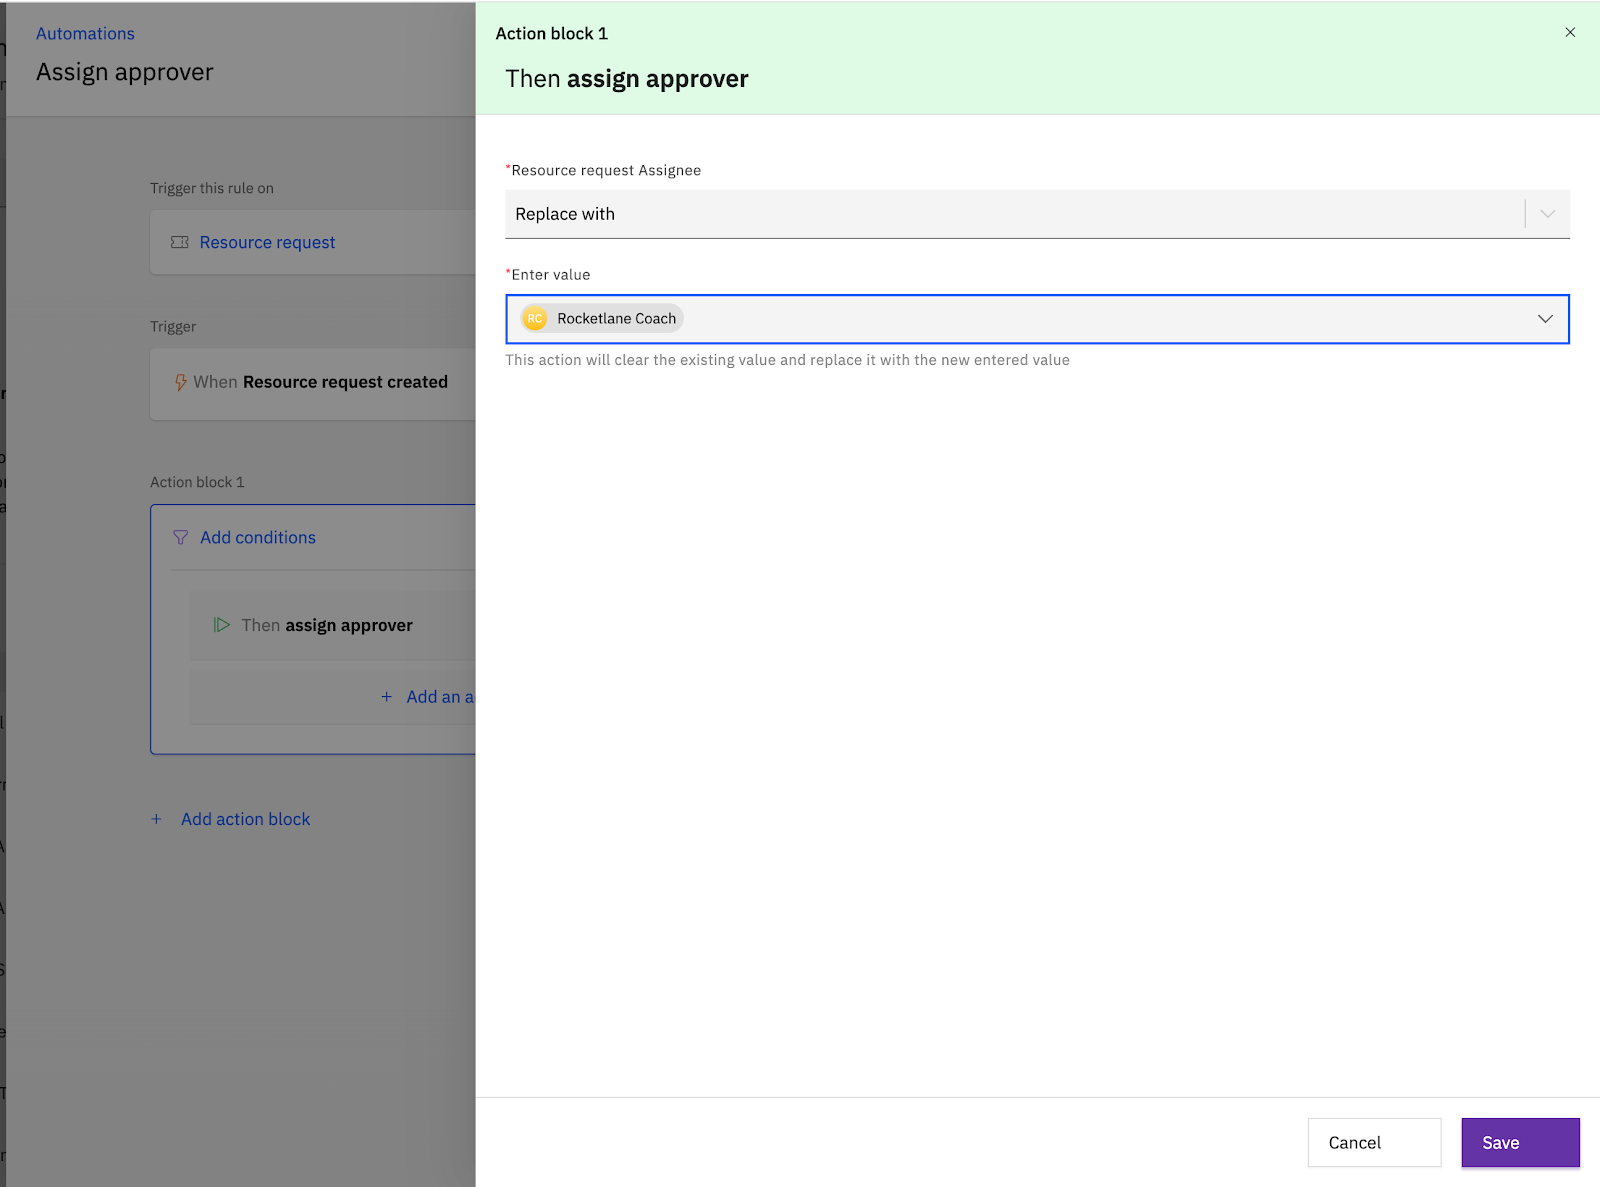
- Set the action as Assign approver and select the approver or approvers.